
If your Google Docs images are not showing in WordPress, first check whether the missing image was saved to your WordPress Media Library. A picture that appears in the editor may still depend on an external address or a temporary browser reference. Replacing it with a saved media file often resolves that specific problem.
There are other possibilities: the clipboard omitted an image, WordPress could not process an upload, or the file exists but the page is displaying it incorrectly. Each needs a different fix. Repeatedly pasting the whole article can make the problem harder to diagnose.
This guide walks through the checks in order, shows how to repair a post manually, and explains how Tenwrite’s Google Docs-to-WordPress publishing workflow can handle image transfer when you publish regularly. Start with one broken image; use what you learn to decide whether the rest need replacing.
Quick diagnosis: what happened to the image?
Compare the original Google Doc, the WordPress editor, and the front-end preview. For published content, also check the public page in a private browser window. A private draft preview normally requires authentication, so a login screen there does not prove an image is broken.
| What you see | What to check first | Next action |
|---|---|---|
| The image never appeared after pasting | Whether it reached the editor at all | Insert that image separately rather than paste the article again |
| It appears in your editor but not for readers | The saved image address and Media Library entry | Replace a temporary or inaccessible reference with an uploaded file |
| WordPress reports an upload error | Whether the file actually reached the library | Read the error, then test one smaller image |
| The file opens directly but looks wrong in the post | Block settings, cropping, and page layout | Compare the editor with the rendered page |
| Only the first image is absent from the body | The post’s featured image | Check whether the publishing settings moved it there |
| The original looks sharp but the post looks blurry | Selected image resolution and display width | Use an appropriate source size before enlarging it |
Make a short list of affected images before changing anything. For a tutorial, record “Step 2 screenshot missing” rather than “image3 broken.” That gives you a way to confirm that the correct picture returns to the correct instruction.
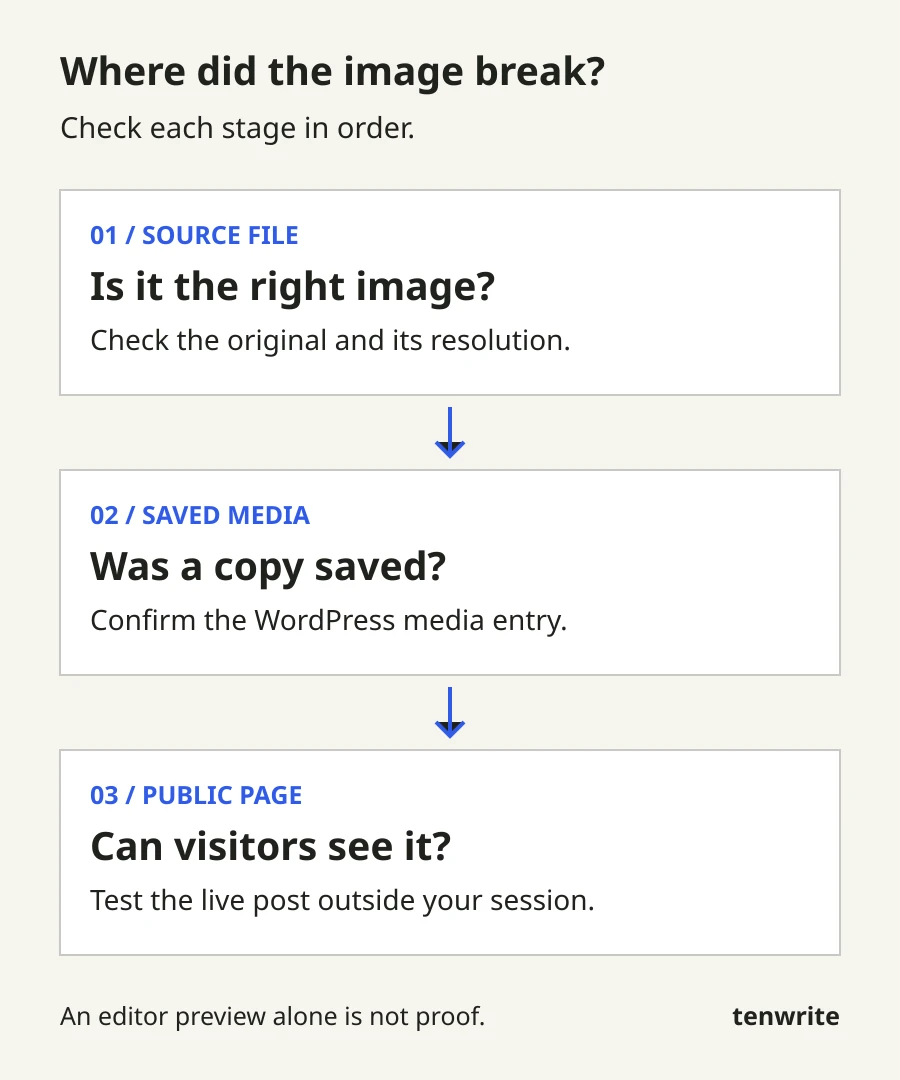
Check the source, saved media, and public page separately. The diagram summarizes the checks described above.
Does copying from Google Docs upload images to WordPress?
It can. Current WordPress Image block documentation says copied images may upload automatically. It also describes an Upload to Media Library control for images that still need saving. If that control appears when you select an image, use it and check the result.
An image visible on the page is therefore useful evidence, but it is not the same as a confirmed media upload. Check the library and the saved image address when diagnosing a failure. Sites using an image CDN may legitimately show a CDN address, so an unfamiliar hostname alone is not proof of a problem.
There are also documented clipboard edge cases. A Gutenberg issue about Google Docs images inside text blocks reports images saved with temporary blob: references instead of durable image files. The report describes pictures visible to the author but missing in another browser. Treat this as one possible explanation, not a diagnosis for every site.
Another Gutenberg report about long Google Docs pastes describes text arriving without images while smaller selections worked. That report concerns a particular environment. If your document behaves similarly, testing one paragraph and one image is more informative than assuming all WordPress installations share the same bug.
Fix missing images manually without rebuilding the post
For an occasional article with a few images, manual replacement may be all you need. Keep the original document open beside WordPress and work through the affected pictures one at a time.
1. Preserve the current draft
Save the post before repairing it. If it is already published, note its URL and avoid creating a replacement post just to fix pictures. Keep any useful captions, links, and surrounding text so you can restore their relationship to the image.
For example, a screenshot may sit immediately after “Choose your destination site.” Replacing it below the next section would technically restore a picture but leave the instructions confusing. Position is part of the repair.
2. Recover a usable source file
Use the original screenshot or illustration from the person who created it when available. That is usually easier to identify and assess than a copy recovered from a broken page.
If the document is your only source, use a Google Docs download format that carries images, such as a Word document or an HTML download, and inspect the exported files. A downloaded document is a recovery copy; confirm that it contains the right image at a usable resolution before relying on it.
Avoid replacing a detailed screenshot with a screenshot of the entire document page. Readers need to see the interface details, and the extra page margins consume space without helping them.
3. Insert the image as a saved media file
In WordPress, add an Image block at the missing image’s location and upload the recovered file or select its existing Media Library entry. Replace the broken element once the new image is visible.
Restore its caption, alignment, and any intended link. If you are repairing several images, save after a small group and check the preview. This makes it easier to identify which change introduced a problem.
4. Check the result outside the editor
Look at the front-end preview at a narrow width as well as a desktop width. A screenshot that is technically present can still be unreadable on a phone. Check that a wide diagram does not push the article beyond the screen.
After updating a published post, open its public URL in a private window. Confirm that the repaired image loads without your editor session. Keep the source files until the whole article passes this check.
If WordPress rejects the upload, follow the error
A failed upload is different from a successful upload that is displayed incorrectly. Before retrying, look in the Media Library: sometimes the file has arrived even when the interface reports an unexpected response.
WordPress.com’s upload troubleshooting guide distinguishes unsupported file types, processing failures, storage limits, and connection problems. Its advice applies to WordPress.com; self-hosted sites also depend on their hosting configuration. Use the actual error as the starting point.
Try one smaller, ordinary JPEG or PNG that you know opens correctly on your computer. If that works, compare the failing file’s format and dimensions. If no image uploads, ask the site administrator or host to investigate the upload path and permissions. Keep the filename, time, and exact error message.
Do not disable file-type protections or loosen permissions broadly to force a publishing deadline. An image-transfer tool cannot make an unhealthy destination accept files. Resolve the destination issue, then retry the affected upload.
If the file opens directly but the article still looks wrong, investigate the page instead. Compare its image block settings with a working picture. Note whether the problem is cropping, width, a missing caption, or a stale version of the page. Change one relevant setting at a time so you can see what fixed it.
Publish Google Docs with images through Tenwrite
Manual repair becomes repetitive when every article contains screenshots, tables, and illustrations. Tenwrite provides a document-to-post workflow with an option to upload images to the destination WordPress Media Library. You still review the resulting post before release.
Tenwrite supports connected self-hosted WordPress and WordPress.com sites. The steps below use the web app. If you need connection instructions first, follow the WordPress site setup guide.
1. Choose the destination before adding content
Open WordPress → New Export in Tenwrite. Confirm the destination site and choose Post for a blog article. This is especially useful when you manage several sites with similar names.
For your first test, use a real document with representative content: a heading, a list, a link, and a few images. A text-only sample cannot tell you whether your image workflow is ready.
2. Select the document or upload a file
Choose Google Docs to select the source document. The web app also accepts local DOCX, Markdown, and text files. For a Word file with embedded images, use DOCX. Plain text does not carry those pictures or document formatting.
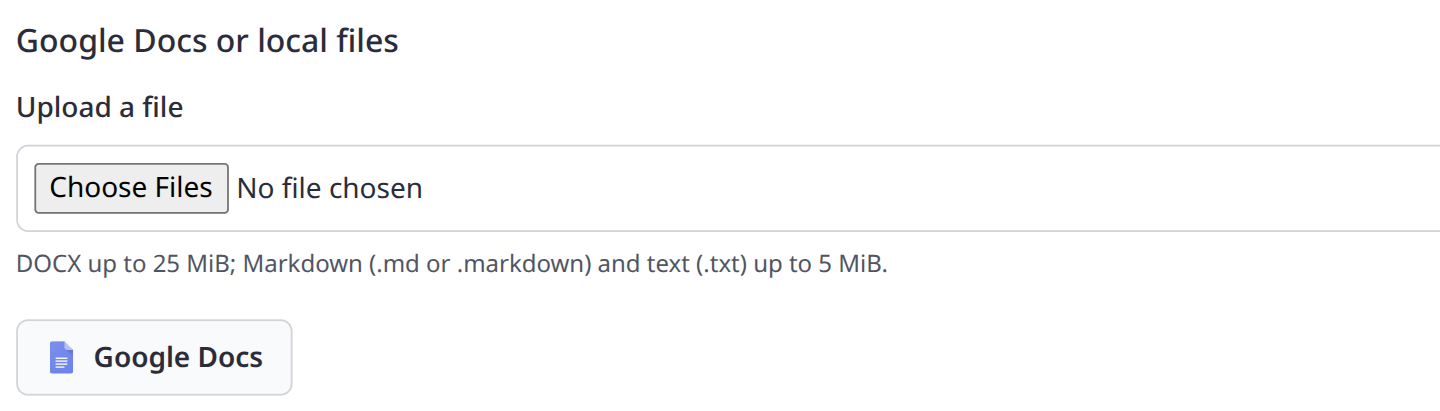
The Tenwrite web app offers both Google Docs selection and local file uploads. Choose the source that contains the article you intend to publish.
Local uploads are prepared copies, not continuous links to a file on your computer. If you revise a local file later, upload the revised version to the existing post through the update workflow. A linked Google Doc uses a different update path, covered below.
3. Review the post details and choose a draft
Set the article title, slug, excerpt, and categories as appropriate. Choose Draft for the first transfer so you can inspect the destination before making it public.
If your Google Doc contains a Tenwrite frontmatter table, matching values can control those fields. Check the effective status rather than assuming the form overrides the document. Tenwrite’s WordPress frontmatter guide explains that precedence.
The visible title, excerpt, and SEO description serve different purposes. Write each for its job; do not fill all three with the same list of keywords. An image-transfer test is also a good opportunity to check that the article’s basic publishing details are complete.
4. Check the image and output options
Open Show Advanced Options and review the content formatting settings. For a modern block-editor workflow, choose WordPress Blocks. Classic HTML is available for workflows that need it. Start with the Balanced cleanup option unless you have a specific reason to preserve more source styling.
Check that uploading images to the WordPress Media Library is enabled. Also inspect the option to use the first image as the featured image. If you use it, account for that picture separately when checking the body.
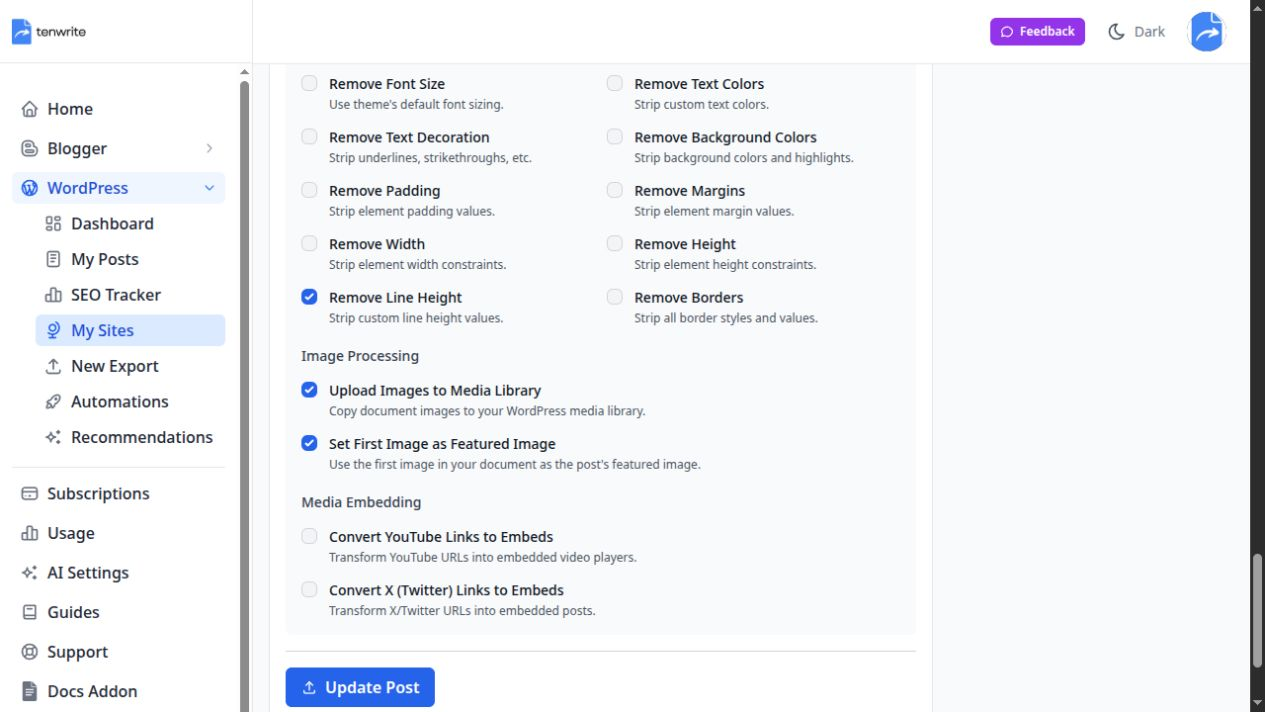
These controls appear under Image Processing. Enable the featured-image option when the first source image is your dedicated cover.
These choices solve different problems. Output format controls how the content is structured. Image upload controls where pictures are saved. Selecting a block format alone is not a substitute for checking image transfer.
5. Confirm the outcome and inspect the result
Choose Start Export, review the publication confirmation, and confirm the export. Check the resulting status and any warnings. Then open the destination post and compare it with the source document.
Tenwrite can report images that could not be saved to WordPress. A Google Docs export may retain original image links for failed transfers, so do not treat a created post as proof that every picture is durable. Resolve warnings before publishing; if the source is a linked Google Doc, retrying through Sync Post updates the existing destination.
For the full sequence and available fields, use the Tenwrite WordPress export guide. If the transfer fails, keep the specific message rather than repeatedly exporting new copies.
A worked example: account for five images
Imagine a software tutorial with one cover illustration and four screenshots. You want the illustration as the featured image, followed by the four screenshots alongside the relevant instructions.
Before export, write this short check:
| Source image | Intended destination | What to verify |
|---|---|---|
| Cover illustration | Featured image | Correct crop and readable appearance in the site’s layout |
| Destination selector screenshot | After the destination instructions | Right site selector visible; no private account details |
| Document picker screenshot | After document selection | Readable file selection and accurate caption |
| Publishing settings screenshot | Before the export step | Draft status matches the written instructions |
| Finished article screenshot | Near the result | Shows the outcome the reader should expect |
After export, you should find the featured image and four body images. Seeing only four pictures in the body is expected in this example. Seeing three means you need to investigate a missing screenshot.
Now inspect the content around each picture. If the settings screenshot shows Publish while your text instructs readers to choose Draft, the image is loading successfully but the tutorial is still wrong. Technical transfer and editorial accuracy are separate checks.
This example is a review method, not a measured claim about time saved. Use your own document to evaluate the workflow: count the manual steps, corrections, and unresolved warnings after the first transfer. That gives you a practical basis for deciding whether to keep publishing manually or use Tenwrite regularly.
Keep images useful, readable, and accessible
Once the pictures load reliably, review whether they help someone complete the task. Remove screenshots that repeat the surrounding paragraph without adding useful detail. Crop unrelated navigation when it distracts from the action, but keep enough context for readers to recognize the screen.
Use descriptive filenames while preparing original assets, and write alt text for what an image contributes. For example, “Tenwrite export settings with Draft selected” explains a useful state. “Google Docs WordPress images best publishing tool” does not describe the picture.
Google’s image SEO guidance recommends descriptive alt text and relevant surrounding content, and warns against keyword stuffing. It also explains the value of standard image elements that crawlers can discover. Loading an image is a prerequisite for a good experience, not a promise of search traffic.
Tenwrite’s AI publishing tools can suggest image alt text on eligible plans. Review suggestions against the actual image. A screenshot can contain a menu label, number, or status that a generic description misses. If the image contains confidential information, remove that information before publishing rather than trying to hide it in a caption.
Update the existing post when the source changes
Image work does not end with the first publication. Product interfaces change, screenshots become outdated, and instructions need corrections. Keep a clear source for the article so the next update does not restore an old picture.
For a post linked to a Google Doc, edit that document and use Sync Post in Tenwrite to send the revision to the existing post. Review changes made directly in WordPress before doing this: the source document may not contain those edits.
Sync Site Content has a different purpose. It refreshes Tenwrite’s index from WordPress so you can browse current posts and pages. It does not push an edited Google Doc into the post. Choose the action that matches the direction of your update.
After a revision, check the specific images you changed, the featured image, and the surrounding instructions. You do not need to rebuild the article or create another URL for a corrected screenshot.
Final check before publishing
Use this compact check for the article you are about to release:
- Every source image is accounted for in the body or featured-image field.
- Images expected to be saved to WordPress have corresponding media entries.
- Captions and screenshots match the instructions beside them.
- Detailed images remain readable at a narrow screen width.
- Alt text describes each informative image’s purpose.
- Export warnings have been resolved or investigated.
- The public page loads correctly outside the editing session after publication.
If you publish occasionally, the manual repair steps may be sufficient. If moving images and formatting is a recurring part of your work, try Tenwrite with one real article. The free plan includes five exports and one connected site. Transfer a draft, compare the images, and decide from the result. See the current plans and included features when you need more publishing capacity or paid tools.
Frequently asked questions
Why do Google Docs images show for me but not for visitors?
The post may contain a temporary browser reference or an external image that visitors cannot access. Inspect the saved image and its Media Library entry. Replace the affected picture with an uploaded file, then check the published page in a private window. Also investigate delivery or layout issues if the file is already saved correctly.
Do I need a plugin just to fix a missing image?
Usually you can upload the original file through WordPress and replace the broken image block. A publishing tool becomes useful when document transfer is recurring work. Diagnose a single failure before adding another plugin or changing site configuration.
Does making the Google Doc public fix WordPress images?
Do not make a private document public as a general image repair. Check the WordPress image reference and save a permitted copy to the destination media library. Document sharing and durable website image storage are different concerns.
Can Tenwrite publish Word files with images too?
Yes. The Tenwrite web app accepts DOCX uploads as well as Google Docs, Markdown, and text. For DOCX, check the converted draft and image-transfer result. Prepared uploads expire after 24 hours; posts already published to your site remain there.
Why is the featured image missing from the article body?
Check whether the publishing options used the first image as the featured image. In that workflow, its absence from the body can be intentional. Whether it appears above the article depends on your WordPress theme and template. Verify both locations before uploading a duplicate.