
To publish an existing Markdown article to Blogger, choose your connected blog in Tenwrite, upload the .md file, enter the title and labels, and keep the first export as a draft. Open the resulting Blogger preview and compare the headings, links, table and images with your source before publishing.
We tested this workflow on November 4, 2026, using a real Markdown file and an owned Blogger test blog. The export created an unpublished draft containing the article’s headings, list, table, quote, code and two images. This walkthrough explains the actual steps and the checks that made the result useful. It also separates the settings that belong in Tenwrite from the content that belongs in your file.
Start with the article you already have
This route suits a writer who keeps articles in a text editor, a repository or another application that exports Markdown. You can upload the existing file directly in Tenwrite’s web app. You do not need to copy it into Google Docs first, and the local-file workflow does not turn it into a linked Google Doc behind the scenes.
The intended result is a Blogger post containing rendered article content. It is different from offering a Markdown file as a download, and different from pasting Markdown punctuation into an ordinary compose area. Choose the workflow according to the output you need, then inspect the saved destination rather than assuming that any successful file selection created a post.
For a document that is already a Google Doc, the Google Docs to Blogger guide covers that source instead. The destination can be the same Blogger blog, but the source and later update controls differ. Avoid converting formats merely to imitate a tutorial when Tenwrite already accepts the file you have.
You still need a Blogger blog you are allowed to manage and its Google connection in Tenwrite. A file upload replaces the document-selection step; it does not remove the account permission needed to write to Blogger. Check that you are working with the intended Google account and blog before exporting anything.
Prepare a small but representative Markdown file
Save the source with a .md or .markdown extension and UTF-8 text encoding. Tenwrite accepts Markdown files up to 5 MiB. Empty files are not accepted, and unusually large or complex content can exceed preparation limits even when the original file is below the size ceiling.
Use a copy of an ordinary article for the first test. Include the elements that matter in your real work. A successful plain paragraph says little about a tutorial containing a table, code example and several images. Conversely, there is little value in building an elaborate syntax test when your regular posts need only headings and paragraphs.
Our working example was a short publishing checklist. It contained two H2 sections, an H3 subsection, three bullet items, a three-column table, one hyperlink, a quote, a two-line fenced code block and two image references. We added a YAML title to check how local metadata was handled. The actual Blogger title was entered in Tenwrite’s form.
Check the source before uploading. Close every code fence, keep list indentation consistent and review the Markdown in your editor if it has a preview. If a closing fence is missing, later prose can become part of the code example. Fixing that in the source is more reliable than repeatedly repairing the destination after each upload.
Keep the filename recognizable and retain the original copy. The filename helps you identify the selected upload, but it is not necessarily the title readers should see. A name such as blogger-checklist.md is useful for the source; the article title belongs in the publishing form.
Give images public addresses
A Markdown image reference points to an image; it does not package that image into the text file. A path such as images/photo.png describes a file in a folder relative to the source. Tenwrite cannot receive that neighboring file when you upload only the Markdown document. Use a direct, publicly reachable HTTP or HTTPS image address instead, preferably HTTPS.
The Markdown image structure is an exclamation mark, a description in square brackets and the image address in parentheses. For a short illustration,  shows where the description and address belong. Replace the placeholder with your actual public image URL before uploading.
Our test used two already published images on Tenwrite’s own site. One was a conceptual document illustration. The other was a screenshot from an earlier WordPress tutorial, used here as ordinary example image content rather than as a picture of Blogger’s controls. Both URLs returned image files without requiring a storage-account sign-in.
You can inspect the public screenshot used in the test to see the difference between a direct image address and a sharing page. For your own post, use images you own or have permission to publish. Public access alone does not grant reuse rights.
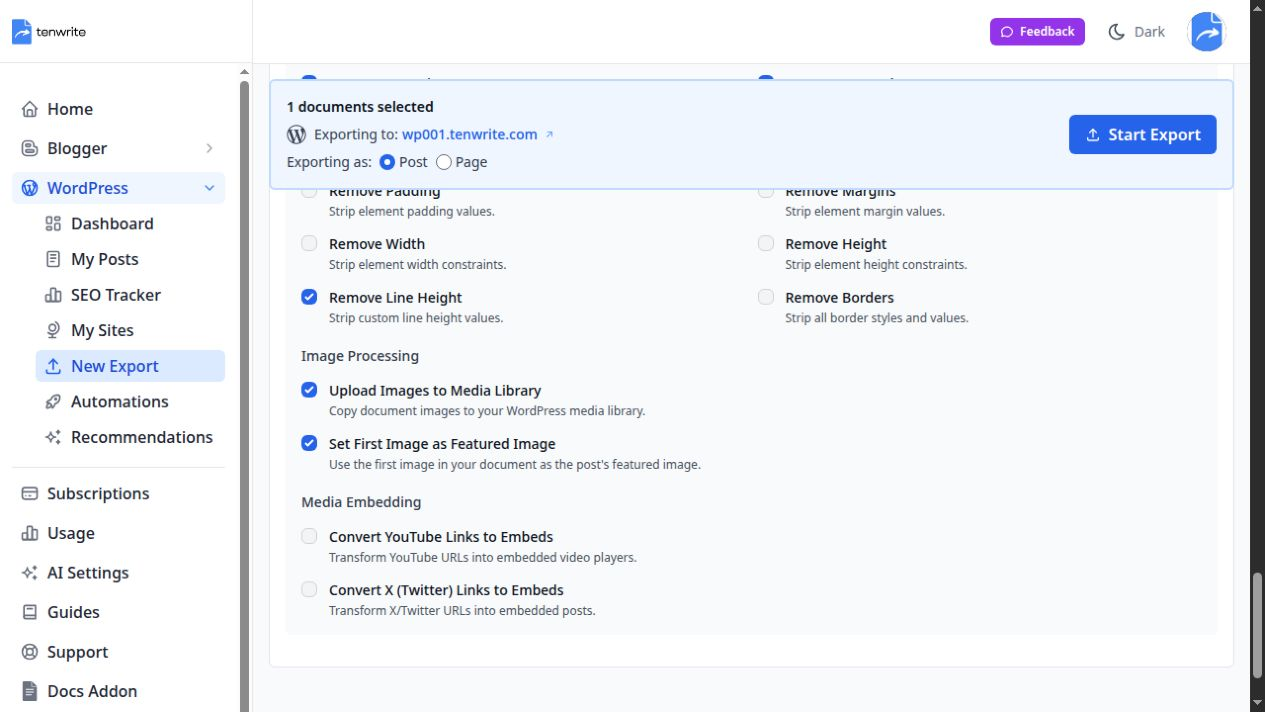
Check your image address outside your signed-in storage session. A cloud sharing page can look accessible to you while the publishing service cannot retrieve the actual file. Temporary links can also expire. Keep the source reachable during preparation, and reduce oversized images if the displayed preparation error calls for smaller media.
Open the Blogger export form
In Tenwrite’s web app, open Blogger → New Export. Choose Post for a regular blog article. The form also offers pages, but that is a different content type; begin with a post for this walkthrough and review the destination before adding the file.
Under Destination Site, select the connected Blogger blog. Read both its name and hostname. A display name alone can be ambiguous when you manage test and production blogs. In our demonstration we used the owned Tenwrite Test 1 blog, keeping the sample separate from the customer-facing article on the Tenwrite website.
Under Google Docs or local files, click Upload a file and choose the Markdown source. Wait for the preparation result. The browser’s file chooser may reset afterward; use the filename and Prepared upload row as the confirmation that the source is selected.
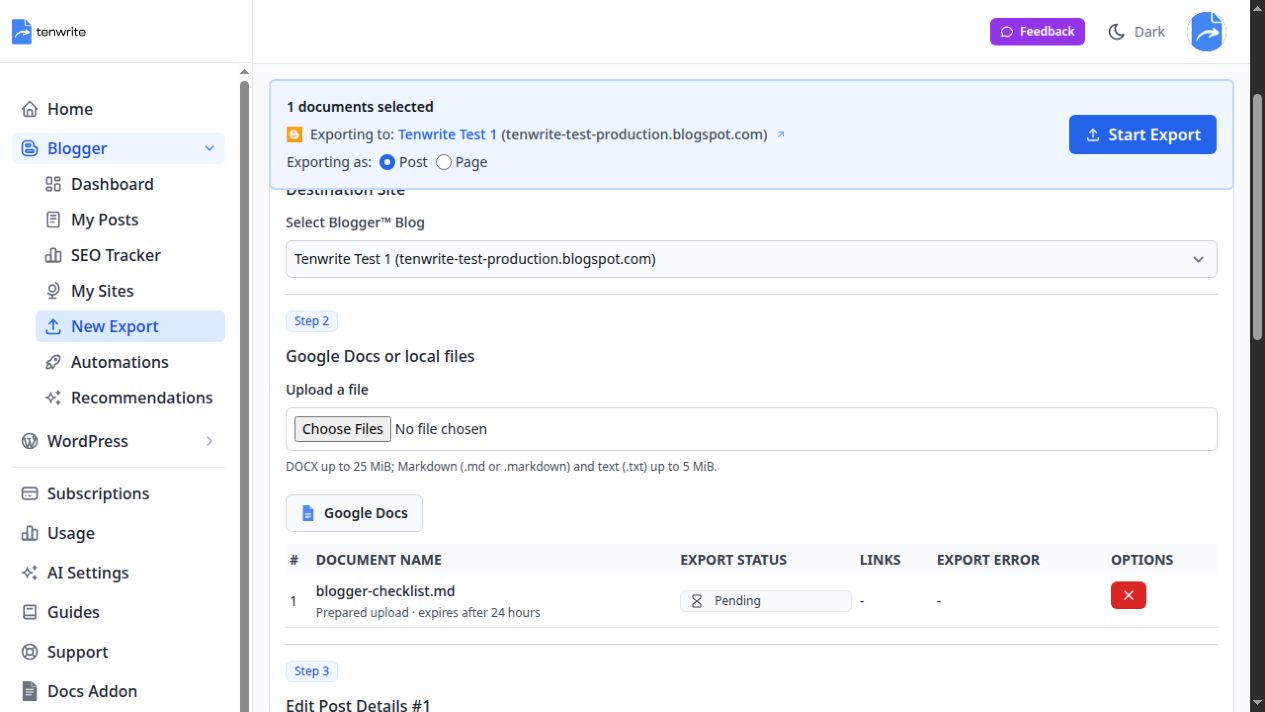
The selected-content list shows the actual prepared Markdown file and the Blogger destination. Selecting a file is preparation, not publication.
Prepared uploads expire after 24 hours. If the preparation expires before you finish, select the file again and review the settings. This does not delete content already saved on Blogger. It means the temporary prepared source needs to be supplied again for the next write.
Enter the title and labels in Tenwrite
Give the draft its intended title instead of leaving the filename as the headline. In our test, the source was blogger-checklist.md, while the form title identified it as a Markdown-to-Blogger draft demonstration. The saved Blogger preview used the form title.
Choose labels through the label control. Enter or select a label and confirm it so it appears as a label chip. Add separate labels individually rather than assuming a comma-separated string has been divided into the labels you intend. We used the single label Markdown and verified that it appeared in the Blogger preview.
Labels help organize the destination blog. They are not a substitute for a descriptive title or useful content. Start with labels the blog already uses when they fit the article, and avoid creating several spelling variants for the same topic. Check the final saved labels before moving on to another article.
For local Markdown, use the form’s publication settings. A recognized YAML header is removed with a warning and does not configure the Blogger post. Our sample included a YAML title deliberately; Tenwrite reported that it was ignored. That warning was expected and did not mean that the article body had failed to prepare.
Google Docs frontmatter is a separate supported workflow. Do not assume a static-site YAML header has the same role as a Google Docs frontmatter table. If a source already contains metadata, check the actual warning and effective settings rather than treating the header as publication authority.
Keep the first result as a draft
Set Status to Draft for the initial test. Review Reader comments too, choosing the behavior appropriate for the blog. These are destination settings, separate from Markdown headings, paragraphs and image references.
A draft gives you a saved result to inspect before visitors encounter the article. It also makes it possible to separate conversion problems from publication decisions. An article can have valid Markdown while its title, labels, images or links still need correction.
Click Start Export and wait for the publication confirmation to resolve. Our confirmation said Will remain a draft and repeated the ignored-YAML warning. Read the effective outcome before clicking Confirm Export. Do not rely only on what you remember selecting earlier in the form.
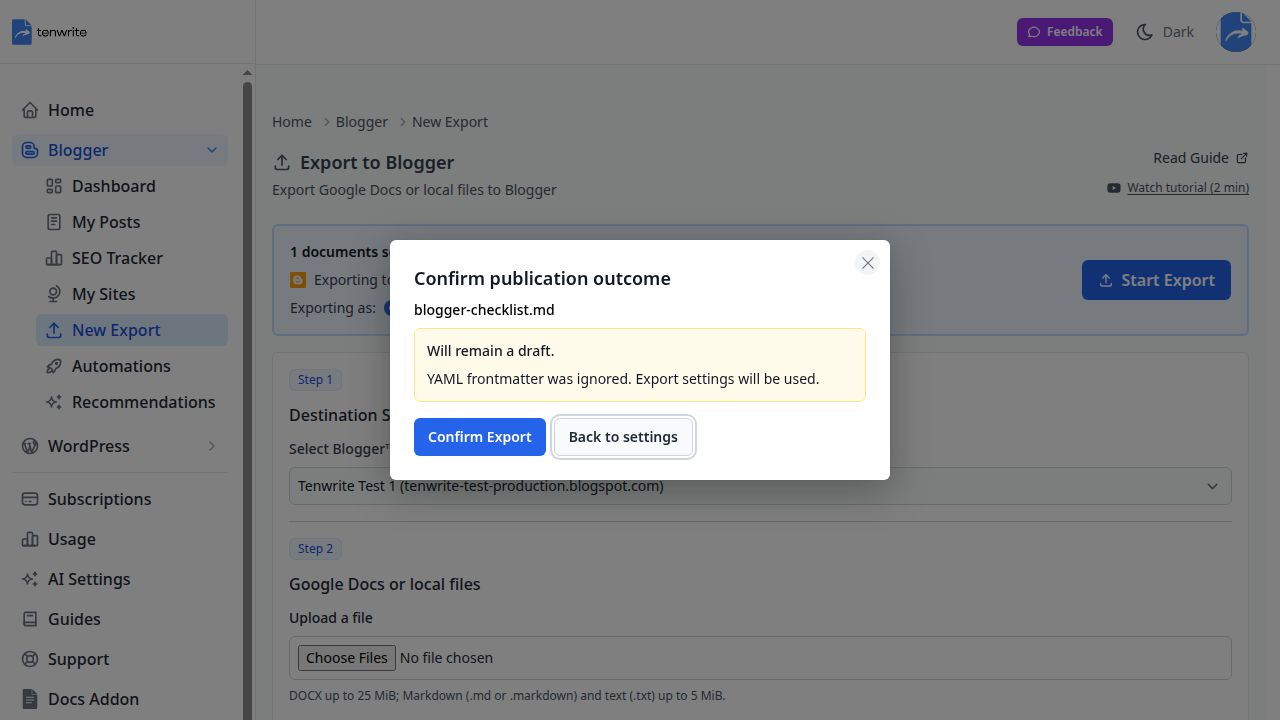
This is the actual confirmation for the demonstration file. The example was saved as an unpublished Blogger draft.
After confirmation, wait for the export row’s result. Our row reported Success and supplied Blogger Edit and Preview links. A prepared file, an accepted confirmation and a completed export are different stages; the resulting destination is the evidence that the write succeeded.
Review the saved Blogger preview
Open Preview from the successful export row. Blogger may need its own signed-in session to show an unpublished draft, even when Tenwrite’s connection is working. Use the account with access to the blog. Keep the draft unpublished while resolving preview access rather than publishing it merely to obtain a public link.
The preview uses the blog’s theme. Headings, spacing, image width and sidebar layout can therefore differ from your Markdown editor. Compare the meaning and structure of the content before deciding that a different font or width is a conversion failure.
In our saved preview, the two H2 headings and H3 subsection retained their levels. The three bullet items remained a list. The table contained the expected header and all three data rows, and the quote and two code lines remained present. The hyperlink pointed to the intended destination, and the Markdown label appeared below the article.
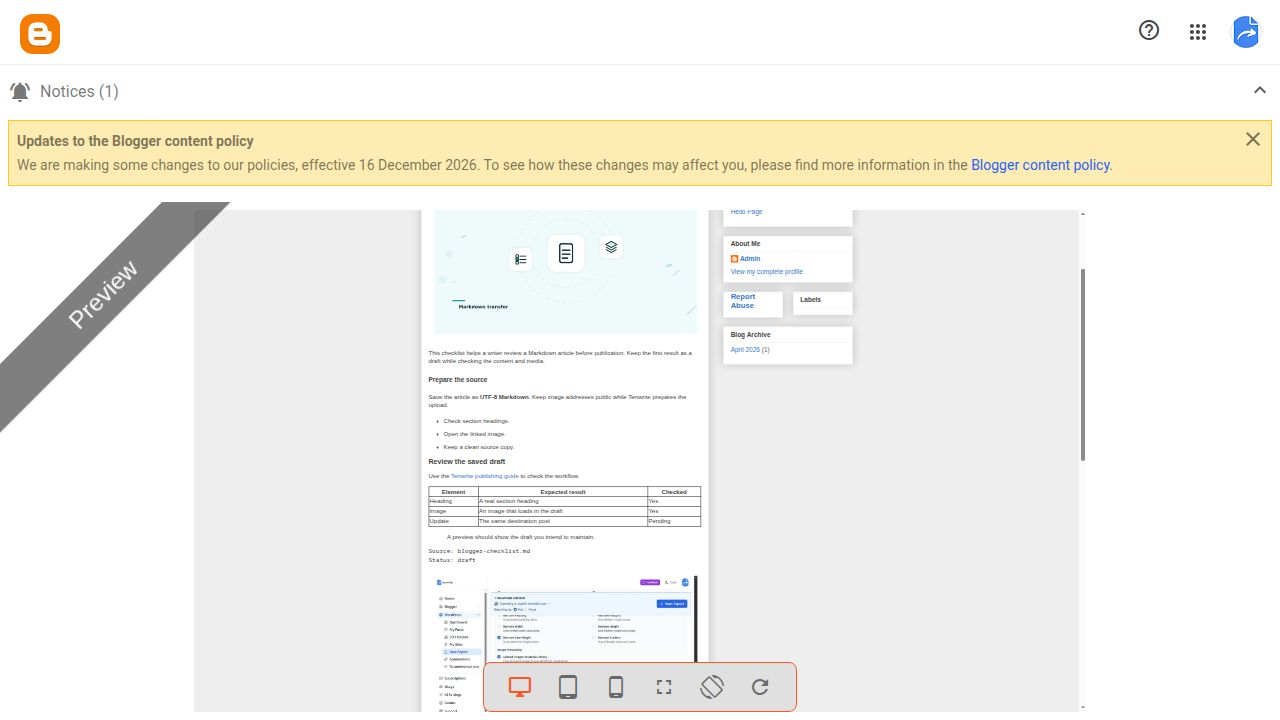
The actual Blogger preview shows the saved sample in the test blog’s theme. Its appearance is specific to that theme; the article structure is checked against the source.
Use a compact review checklist for your own article:
| Element | Check in the Blogger draft |
|---|---|
| Title and labels | The saved values match the form choices |
| Headings and lists | Levels, order and nesting communicate the intended structure |
| Table and code | Cell values, punctuation and meaningful line breaks survive |
| Links | The actual targets are correct and reachable |
| Images | The intended images load in the right positions with useful alt text |
A successful first sample is evidence about that file and configuration. It does not establish that every Markdown extension, embedded widget or theme behaves identically. Add any unusual element your real article depends on to the test before transferring a larger batch.
Check image loading separately
Tenwrite processed the test’s public-source images into its image-serving URLs for Blogger. This is different from the WordPress Media Library workflow. Do not look for a WordPress featured-image checkbox or assume the images have been uploaded into a Blogger photo album simply because they display in the post.
Both images loaded in the saved Blogger preview. The second image initially had not loaded while it was outside the visible area; after scrolling to it, the browser reported that it had loaded successfully. A below-the-fold image waiting to load is different from a failed image request. Inspect the actual image before diagnosing a missing-media problem.
Check the cover’s position and crop in the preview. The first content image can influence how a theme presents the post, but Blogger themes and sharing surfaces vary. This workflow does not offer the same dedicated featured-image control as WordPress. Use an appropriate leading image and inspect the result in the theme you actually use.
Review the image descriptions as well. Alt text should describe the picture and its role. It should not claim that an ordinary sample image proves a setting or outcome. The steps remain in the article text so readers can follow the workflow without having to decipher a screenshot.
Check a narrow preview before publishing
Blogger’s preview provides desktop, tablet and smartphone controls. Use them to inspect the article at a narrow width as well as on the desktop. A wide table or code line can be readable on your monitor while requiring awkward sideways scrolling on a phone.
Look at the longest heading, the widest table row and any literal URLs inside code examples. Keep code samples as short as their purpose allows. When an example needs a long address, a clearly identified placeholder with a normal link to the real resource can be easier to read than a single unbroken code line.
Confirm the text remains complete when the layout changes. Check images after scrolling to them, and distinguish the preview’s device frame from the content area inside it. These checks help you find presentation problems, but they are not a measurement of Core Web Vitals or a guarantee of identical rendering on every physical device.
Make later changes from a clear source
A local Markdown upload is a snapshot. Saving a sentence in your editor does not automatically update Blogger. Keep the source filename and the resulting destination together so you know which article a later revision should replace.
For a revised local source, open the existing Blogger post in Tenwrite’s Full Edit, upload the revised file and review Update Post. Check the effective publication outcome again. The initial draft status does not remove the need to review a later write, especially if you have changed publication settings meanwhile.
This article’s demonstrated result is the first successful Markdown draft and its Blogger review. Before relying on a maintenance process for a live archive, test a small revision on your own draft and confirm that it reaches the same destination. Creating a second post from New Export is not evidence of an existing-post update.
If you edit directly in Blogger, decide how the correction will reach your Markdown master. A later upload from an older file can overwrite the destination change. Avoid keeping two independently edited versions without recording which one owns the next revision.
Troubleshoot the specific failing step
The file will not prepare. Check the extension, UTF-8 encoding, nonempty content and 5 MiB limit. Read the displayed error. A smaller representative file helps distinguish a problem in one article element from a destination or connection issue.
An image reference fails. Replace local paths with direct public image URLs. Check that the address returns an image rather than a storage sharing page. Keep the image available during preparation, and try a smaller supported file if size or complexity is the reported problem.
The title or labels are wrong. Review the form values and confirmed label chips. A YAML title is ignored in this local-file route. Inspect the saved Blogger values after correction rather than treating successful preparation as proof that the metadata is right.
The preview does not open. Check the Blogger account and destination access. An authentication requirement for a private draft does not mean that the export failed. Use the result’s Edit link to identify the saved destination and resolve access without creating another post.
Formatting differs. Compare a small source element with the saved draft. Check Markdown indentation, table separators and closed code fences first. Then consider the blog theme. Change one cause at a time and recheck the relevant part of the draft.
Try one existing Markdown article
Start with an article you already want to publish on Blogger. Give its images working public URLs, upload it through Tenwrite, enter the title and labels, and confirm a draft outcome. Review the saved Blogger result before deciding whether the workflow fits your regular writing process.
Tenwrite’s pricing page lists the current export and site allowances. Manual local-file publishing is available within those allowances; the free starting allowance is five included exports, not a monthly renewal. Local Markdown files are not continuously watched, and Google Docs Drive automation is a separate workflow.
If your destination is WordPress instead, use the tested Markdown to WordPress walkthrough. For Blogger, try one Markdown draft in Tenwrite and judge the actual saved content, images and review process with your own source.