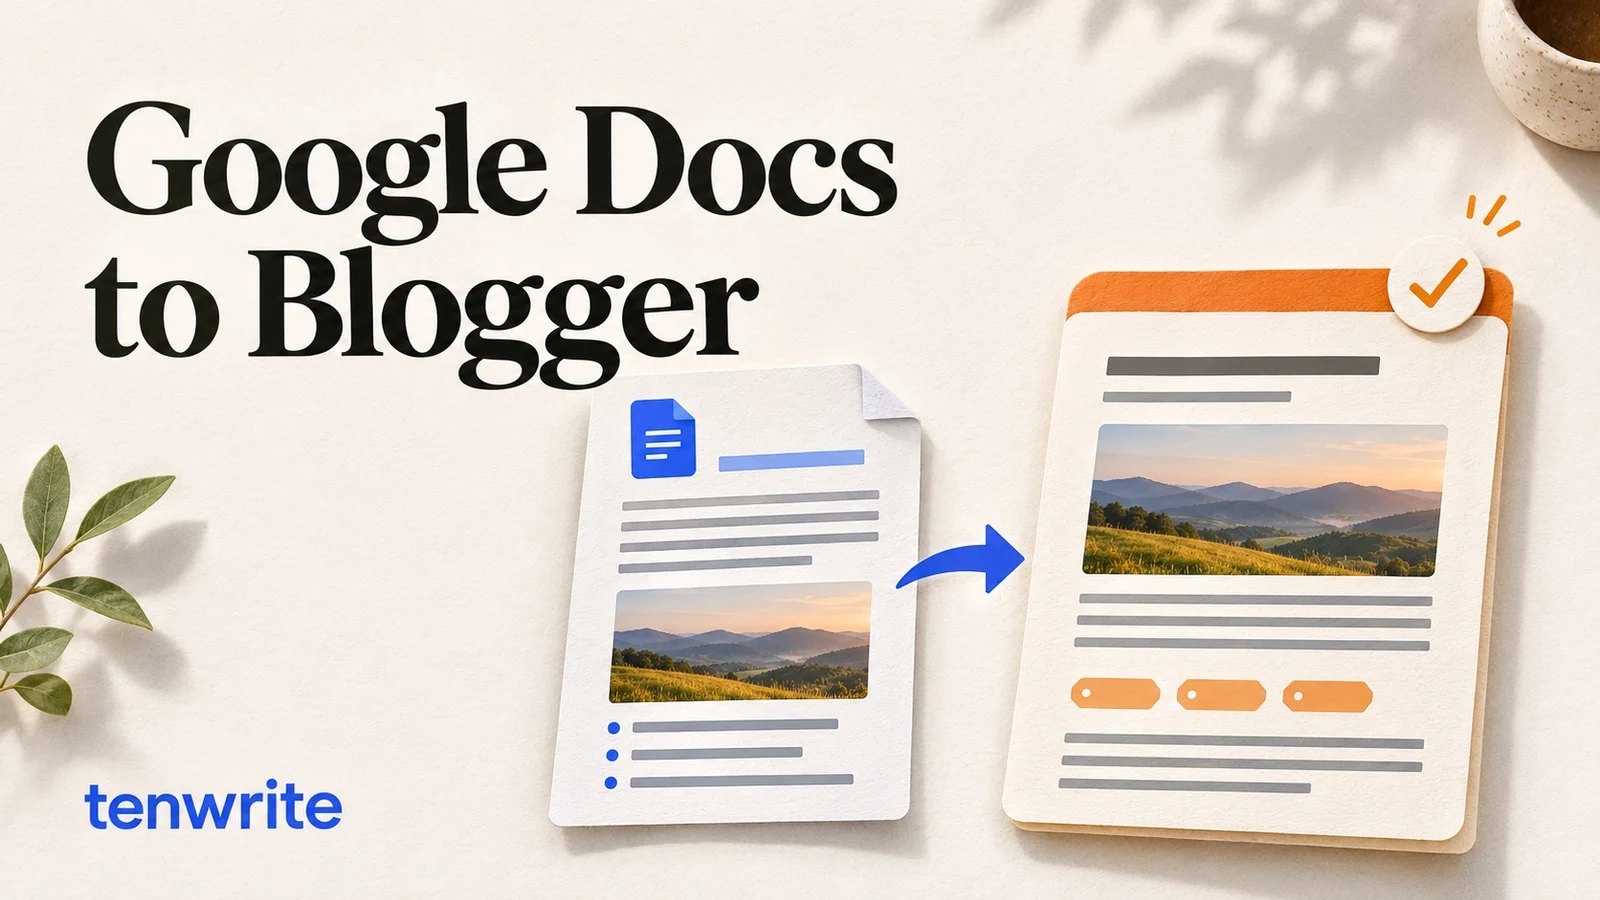
To publish Google Docs to Blogger with Tenwrite, open Blogger → New Export, choose your blog, select your document with Google Docs, and review the title, labels and publication status. Click Start Export, check Confirm publication outcome, then choose Confirm Export. Open the resulting post or preview to check the page before sharing it.
You can also upload DOCX, Markdown and text files in Tenwrite’s web app. You no longer need to convert every Word document into a Google Doc first. The important difference comes later: a linked Google Doc can update the same Blogger post through Sync Post, while a local file needs a revised upload.
This walkthrough covers both choices, image and formatting checks, scheduling, and updating an existing article. It uses the current Tenwrite web interface. The screenshots show an approved demonstration document and a test blog; the scheduling example stops at confirmation and does not publish a post.
Choose your Google Docs to Blogger workflow
For an occasional short post, pasting into Blogger may be enough. For a document with several images, headings, links and recurring revisions, a document-based publishing workflow is easier to repeat consistently.
| Method | Best fit | Review |
|---|---|---|
| Paste into Blogger | A simple post | Spacing and links |
| Google Docs in Tenwrite | Shared writing and later revisions | Frontmatter and status |
| Local-file upload | DOCX, Markdown or text | File size and images |
Blogger’s own editor supports drafts, previews, publishing and scheduled posts. Google describes those controls in its Blogger writing and publishing guide. Tenwrite adds a route from your writing source to Blogger, with document conversion and controls for publishing that source again.
No converter can make every Google Docs layout look identical in every Blogger theme. A blog’s fonts, content width and CSS affect the result. The practical goal is readable headings, working images and links, and a publishing process you can repeat without rebuilding each article.
Prepare your document before exporting
Finish the editorial review in your source document first. Check factual claims, image rights, spelling and the action you want a reader to take. Exporting an unfinished draft faster does not make it ready for readers.
Use real heading styles in Google Docs. Make section titles Heading 2 and subsections Heading 3 when your Blogger template supplies the article’s main title. Making a sentence larger and bold does not necessarily give it the same structure as a heading.
Keep paragraphs reasonably short, use real lists, and give links descriptive text. “Download the meal plan” tells readers more than several identical “click here” links. Avoid using spaces, tabs or elaborate tables to position ordinary paragraphs: a layout that looks aligned on a desktop document can become difficult to read on a narrow phone screen.
For images, use the versions you intend to publish, with permission to use them. Reduce oversized source images where practical. A photograph that fills a printable page may contain more pixels than your blog needs. Add useful alternative text for informative images; explain the information a reader would miss if the image did not load.
Before the first export, confirm that you can access the Google Doc with the account you select and that you have publishing access to the intended Blogger blog. You do not need to make an ordinary document public just to select it through your authorized Google account.
Publish a Google Doc to Blogger in seven steps
1. Open Blogger → New Export
Sign in to the Tenwrite web app and open Blogger → New Export. Connect your Blogger account through Tenwrite’s normal connection flow if you have not already done so.
Choose Post for an article in your blog feed. Use Page for something like an About or contact page. This distinction matters for scheduling: Blogger pages cannot be scheduled through this workflow.
2. Choose the destination blog
Under Destination Site, select the correct blog. Check the address as well as the name, especially if you manage client blogs or maintain separate test and production sites.
The summary at the top shows the destination and whether you are exporting a post or page. Read it before proceeding. A successful export to the wrong blog is still the wrong result.
3. Select Google Docs or upload a local file
Click Google Docs to open the document picker, select your approved document, and confirm the selection. The document appears in the export table. Start with one representative article while you learn the workflow, even if your eventual process involves multiple documents.
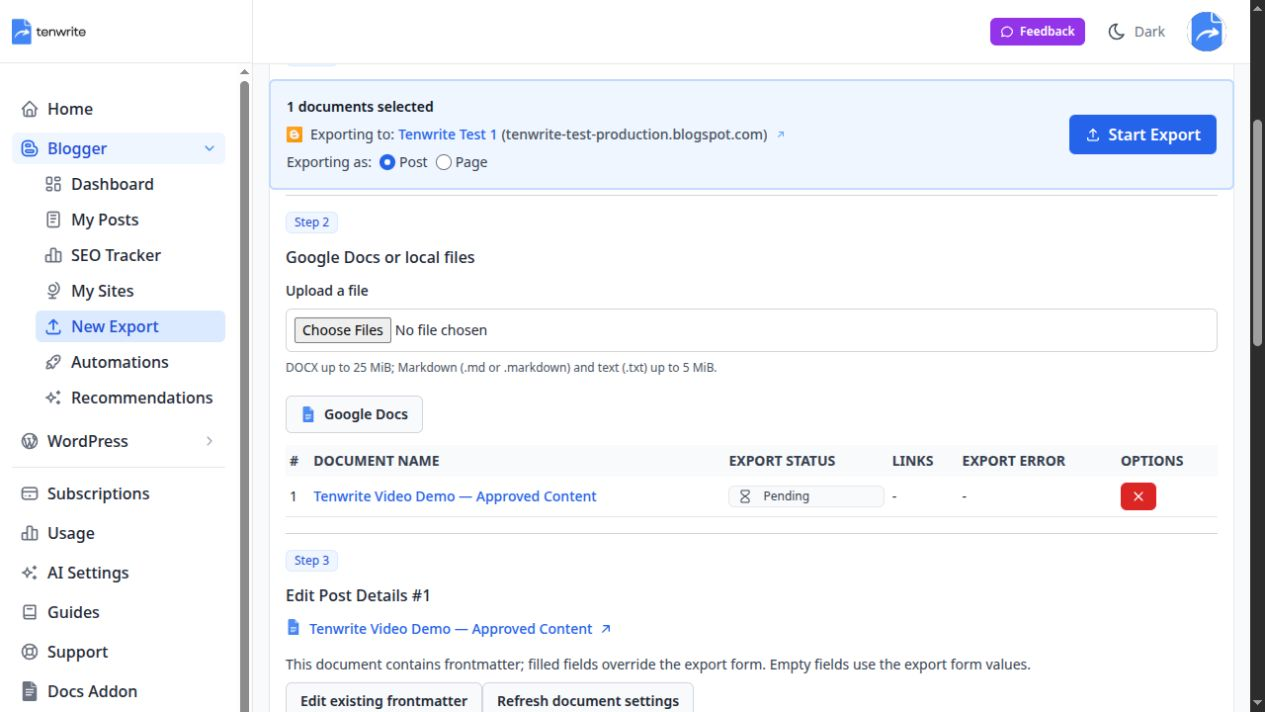
Current web interface: Google Docs and local-file upload are both available. The selected document here is Tenwrite’s approved demonstration content.
If your source lives on your computer, use Upload a file instead. Current web-app limits are:
- DOCX: up to 25 MiB.
- Markdown: .md or .markdown, up to 5 MiB.
- Plain text: .txt, up to 5 MiB.
A DOCX can carry embedded images. Markdown image references need accessible image URLs; a relative path to an image on your computer does not upload that image by itself. Plain text does not carry document-style formatting or embedded pictures. Choose the source format that actually contains the material you need to publish.
The file-upload route is a web-app option. If you are working in the Google Docs add-on, you are already working with a Google Doc. See the Blogger export documentation for the maintained product walkthrough.
4. Review the title, labels and comments
Under Edit Post Details, review the title rather than assuming the document’s filename is an ideal headline. It should tell the intended reader what the article helps them accomplish. Remove internal markers such as “final v3” or “client review copy.”
Add relevant Labels. In the current web form, type to search existing labels or create a new one, then select or confirm each label. Selected labels appear as separate chips. Do not leave the label sitting as unconfirmed text in the input.
Choose a Reader comments setting appropriate to the article. Tenwrite offers Allow, Do not allow, show existing, and Do not allow, hide existing. Changing comment visibility does not replace a moderation policy or an editorial review.
If a field says Already set in frontmatter, its value comes from the document. Use the frontmatter editor to change that value; repeatedly typing into a locked form field will not change the source setting.
5. Choose Draft, Publish or Scheduled
For your first export, Draft is usually the easiest choice because it gives you a review point inside Blogger before the article becomes public. Choose Publish when the article is ready now. Choose Scheduled and enter a valid future Publish Date when it should go live later.
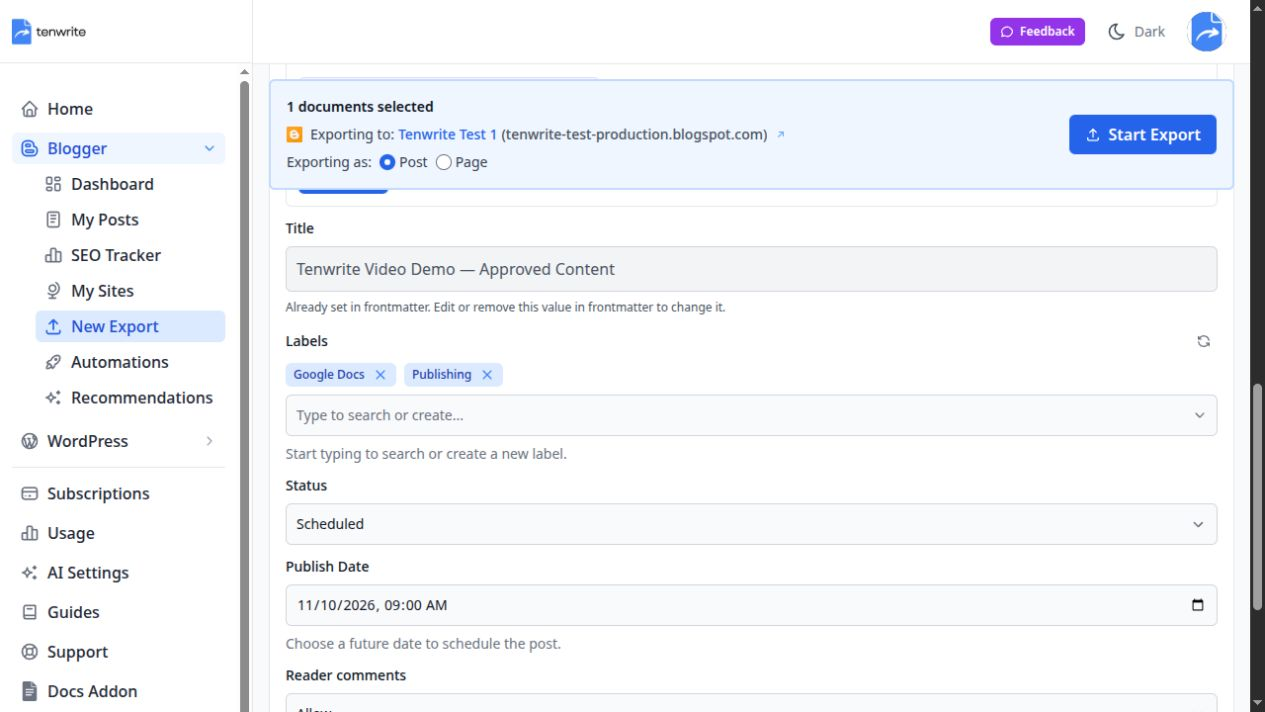
Demonstration settings: two selected labels and a future publication date. Verify the resolved timezone in the outcome preview before confirming your own export.
Do not rely on the status dropdown alone when your Google Doc contains publication settings. Filled frontmatter fields take priority. The next section explains how to avoid an unexpected outcome.
6. Check formatting options
Open Show Advanced Options if you need formatting controls. Tenwrite offers formatting modes including Balanced and Original, plus individual transformations. Begin with a consistent preset, preview a representative article, then adjust only the options that solve an observed problem.
For example, responsive image styling can help an image fit the content width. Heading adjustments may help when your source includes an extra main heading. Changing several transformations at once makes it harder to identify which one caused an unwanted result.
These options affect exported content. Your Blogger theme still controls much of the page’s final appearance, including surrounding navigation, typography and spacing.
7. Confirm the publication outcome and export
Click Start Export. Tenwrite opens Confirm publication outcome and resolves what will happen to the selected document. Check whether it will remain a draft, publish now or be scheduled, along with any displayed date and timezone.
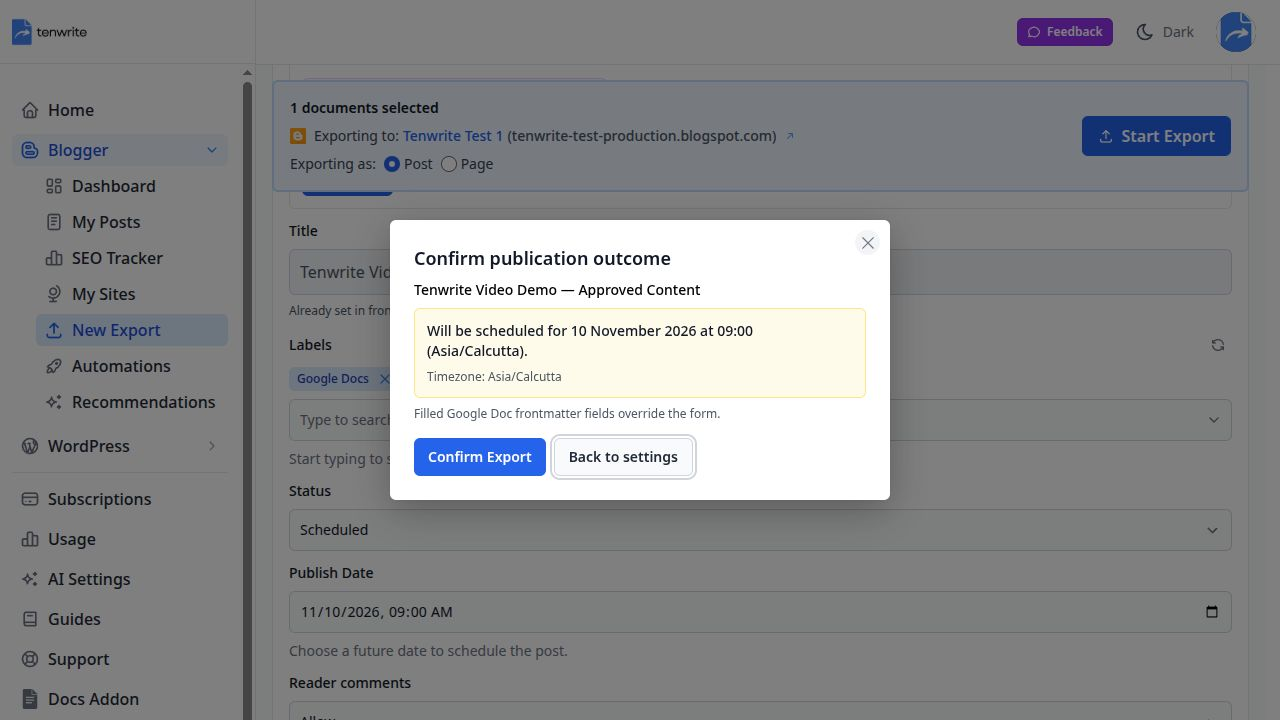
This example stops before Confirm Export. The dialog shows the resolved outcome, including the saved account timezone, rather than just repeating the selected status label.
Use Back to settings if anything is wrong. Choose Confirm Export only when the outcome matches your intention. Then wait for the export result and use its available post or preview link to inspect the destination. A row marked Pending means the export has not completed.
Scheduling and frontmatter: which setting wins?
Frontmatter is a small settings table in the Google Doc that lets the document carry publishing details such as its title, labels, status and date. Tenwrite removes that metadata table from the published article body.
You do not need frontmatter for a basic export. When it exists, filled fields override matching form values; empty fields fall back to the form for a new export. This is useful when several people prepare content in Docs, but it also means the form may not tell the whole story.
The important publication cases are:
- Keep as draft is explicit: the document stays a draft even when it contains a future date.
- Automatic with a valid future date can schedule the post, even if the export form still shows its default Draft choice.
- Scheduled needs a valid future date and a usable saved timezone.
- A missing or invalid timezone, a past scheduling date, or an ambiguous daylight-saving time needs correction before scheduling.
Use the editor’s Publication and Publish date controls, save the frontmatter, and review the resolved outcome again. For the full field list and examples, read Blogger frontmatter settings.
Tenwrite interprets these dates using the timezone saved in your Tenwrite account, shown in the preview. It is not safe to infer that timezone from your laptop clock. Blogger’s native scheduling controls have their own blog settings, so check the schedule at the destination too when coordinating a launch across timezones.
Use Blogger labels to help readers navigate
Labels group related articles. Choose names you would be comfortable showing in your blog’s navigation: “Vegetarian recipes,” “Travel planning” or “Product tutorials,” for example.
Reuse an existing label when it means the same thing. Creating “Google Docs,” “Google documents” and “Docs tutorials” for the same small group of articles can make your archive harder to browse. A short, deliberate set is easier to maintain than a different set of near-duplicates on every post.
In the web form, confirm individual label chips. In a Google Doc’s frontmatter table, the labels value is a comma-separated list. Those are two interfaces for supplying labels; do not confuse the table’s format with leaving unconfirmed text in the form.
Labels are an organization tool, not a promise of search rankings. Put your effort into answering the searcher’s question, writing a clear title and linking to relevant articles. Avoid adding every keyword variation as a label.
Check images, formatting and SEO before sharing
Open the actual Blogger preview or published page. Reviewing the source document alone misses theme-specific problems. Check the article on a desktop and a phone-sized screen.
Use this short review:
- Structure: the title is clear, section headings are in order, and there is no unnecessary duplicate title inside the body.
- Images: every intended picture loads, has the correct crop and orientation, and fits within the article column.
- Links: internal links reach the right article, external references work, and download or signup links lead where promised.
- Readability: paragraphs, lists and tables remain usable on a narrow screen.
- Publication: the right blog contains the right post, with the intended labels, comment setting and status.
If an image is missing, first distinguish between a source-image problem and a display problem. Is the image actually embedded in the selected document or DOCX? Is a Markdown image URL accessible? Does the published HTML contain an image that the theme clips or hides? Solve the failing layer before changing the whole export preset.
Google’s Blogger image guidance covers native image insertion and management. You can use Blogger’s editor for a targeted correction when needed, but bring that change back into your source before a later document sync replaces the body.
For search, make the title specific, answer the main question early, and add useful links to related material. Review any Blogger search-description or theme settings in Blogger itself. Do not assume WordPress plugin features such as Yoast or Rank Math metadata apply to Blogger. Publishing clean content supports a sound workflow; it does not guarantee indexing, rankings or clicks.
Update the same Blogger post after editing Google Docs
Once a post exists, use its existing record for revisions. Starting another New Export is not the update workflow and can create another article.
For a linked Google Doc:
- Finish and approve the changes in the original document.
- Open Blogger → My Posts in Tenwrite and locate the existing article.
- Open its row’s Options menu and choose Sync Post.
- Review the publication outcome, including document frontmatter, date and timezone.
- Choose Confirm Sync, wait for completion, then check the same destination post.
Sync Post re-exports the linked document into the existing post or page. It keeps that destination item instead of creating a duplicate. The menu uses the same name for pages. Read the Sync Post guide for the current behavior.
Treat the linked Google Doc as the source of truth for body content. If someone edits the article directly in Blogger, reconcile those changes into the Doc before syncing. Otherwise, the next source export can overwrite the direct edits.
Blank publication settings during sync preserve the existing post’s state. To cancel scheduling, explicitly choose Keep as draft, save and review the confirmation. If a previous schedule has already published, Tenwrite checks it against the destination date; correct a reported mismatch instead of guessing which old setting is still appropriate.
For an article created from a local file, open the existing row’s Full Edit, upload the revised file and use Update Post. A local upload is a snapshot, not a continuously linked document on your computer. Keep a clearly named current source so the next revision uses the approved version.
Sync Site Content does something different: it reads the latest site state into Tenwrite’s index. It does not push your newly edited Google Doc to Blogger. Choose the action based on which direction the change needs to travel.
When to add publishing automation
Get one manual export and one existing-post update working before automating a larger workflow. That gives you a known destination, formatting preset and review process to reuse.
Tenwrite’s Google Drive automation watches Google Docs in a configured folder. It is not a general watcher for arbitrary local files on your laptop. Google Sheets automation can organize publishing instructions using supported document links or content fields; its logs and output status help you see what happened.
These publishing automations are available on eligible Pro and Agency plans, and checks run hourly rather than instantly. Source access, frontmatter and publication settings still matter. A spreadsheet row does not remove the need to verify who can access the source or when the article should publish.
If you are evaluating Tenwrite, start with the manual workflow and compare your publishing volume with the current plans. You can test the document-to-blog process before building a larger editorial system around it.
Frequently asked questions
Do I have to convert a Word document into Google Docs?
No. The Tenwrite web app accepts DOCX directly, within the current 25 MiB limit. Use Google Docs when collaboration and later Sync Post updates from a linked document are part of your workflow.
Why is the title or another setting locked?
A filled frontmatter field owns that value. Edit or remove it through the document’s frontmatter controls, save, then refresh the document settings and review the outcome again.
Why did my scheduled article remain a draft?
Check whether frontmatter explicitly says Keep as draft. That choice stays a draft even with a future date. Also check validation messages and the resolved account timezone. Change the publication choice deliberately rather than repeatedly exporting the same draft.
Will editing a Google Doc automatically change my published post?
A normal manual export does not make every keystroke publish automatically. Run Sync Post when the revision is approved, or use a separately configured automation with its own rules. Always inspect the result after an important update.
Can I use Tenwrite without learning HTML?
Yes. The standard workflow uses document selection, publishing fields and a confirmation dialog. You still need editorial judgment and a final preview, especially for images, complex tables or custom Blogger themes.
Publish your next article from the document you already use
Prepare one useful article, select the correct blog, and make the publication outcome explicit. Then check the destination and keep a repeatable update process. Those habits matter more than adding complicated formatting rules before you know you need them.
Ready to try it with your own content? Open Tenwrite, choose Blogger → New Export, and send your first document as a draft. Review it in your theme, then publish when it is ready for readers.