
“Upload a template to Google Docs” describes several different tasks. You might need to open a client-supplied .docx file, make a reusable copy of an existing Google Doc, or add a template to an organization’s Template Gallery. Those routes are not interchangeable.
The best choice depends on four things: where the template currently lives, who will use it, how often it will be reused, and where the finished document needs to go. A public Google Doc may be enough for simple sharing. An embed may suit supporting reference material. A native WordPress post is usually the better destination when the content needs normal site editing and publishing controls.
This guide explains the three practical routes and then connects template reuse to that publishing decision. It also includes a content-template example for agencies that prepare recurring client articles.
What “upload a template to Google Docs” can mean
There is no universal Google Docs command called “upload template.” In practice, the query usually refers to one of these outcomes:
| Desired outcome | Appropriate route | What you get at the end |
|---|---|---|
| Open a file created outside Google Docs | Import the file to Drive and open or convert it in Google Docs | An editable Google Doc based on the external file |
| Reuse a document without changing the original | Maintain a master Doc and make a copy for each assignment | A separate working document with the original intact |
| Make a template available through a built-in organizational gallery | Use the template-gallery controls available to your account or Workspace | A gallery entry, if that capability is available in your environment |
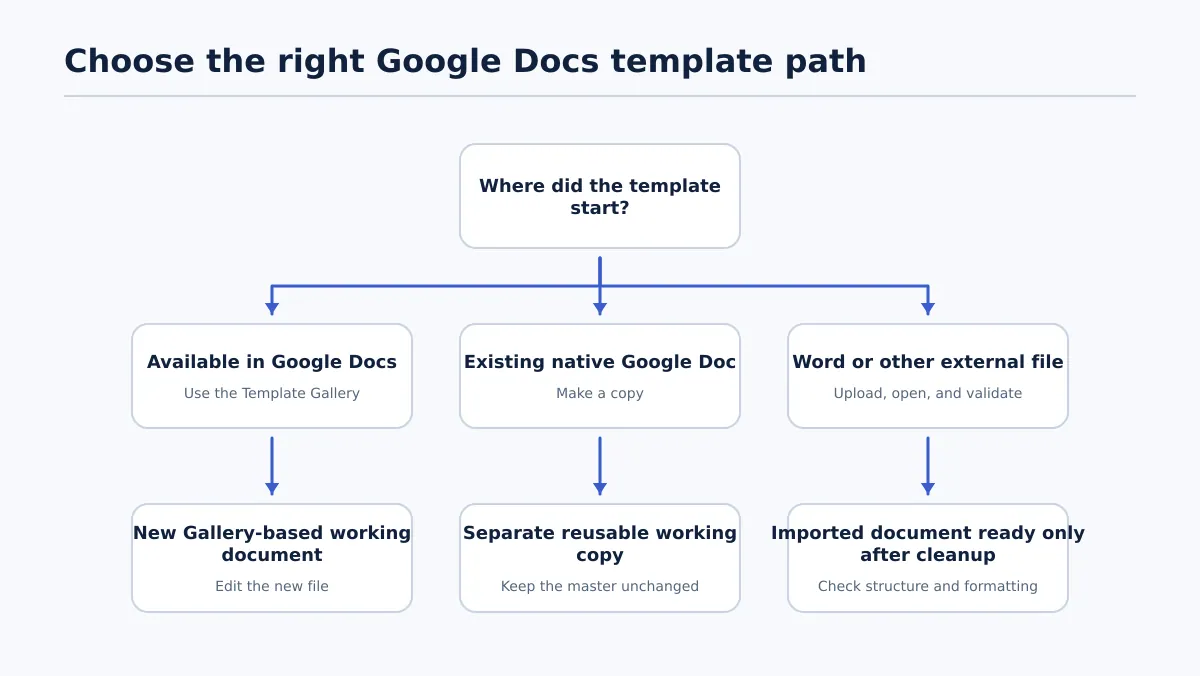
The first two routes are generally practical for content teams: importing a file works when the source begins in Word or another supported format, while a master-and-copy arrangement works well for a recurring editorial format. Gallery availability is a separate question and should not be assumed.
For the official overview of available templates, see the Google Docs Template Gallery. If your goal is to publish the finished document on a website, template selection is only the beginning. You still need to choose the right destination and check the result there.
Choose the right template route before you start
Make the route decision from the source file and the intended reuse pattern, not from the word “upload.” This quick comparison covers common agency situations:
| Situation | Best starting route | Reason |
|---|---|---|
A client sends a .docx brief with required headings and tables | Import and inspect the converted document | The source already exists outside Google Docs, so conversion is faster than rebuilding it manually |
| The team drafts the same type of blog post every week | Create a master Google Doc and distribute copies | Writers get a fresh document while the approved structure remains unchanged |
| An organization has a shared template that many users should find from Google Docs | Check the available gallery or Workspace template controls | A gallery route may improve discovery, but the controls vary by account and configuration |
Before choosing, answer these questions:
- What is the source format? A Word file, an existing Google Doc, or a template already visible in the gallery?
- Who needs to reuse it? One editor, a small team, or a broad organization?
- How frequently will it be used? Occasional reuse may not justify gallery administration.
- Must the master remain controlled? If changing the source would create confusion, use a master-and-copy rule.
- Where will the finished content live? A collaborative Doc and a published web article have different requirements.
The route is complete only when the resulting document has the right access, a clear name, and a known next step. Opening a file is not the same as creating a reusable template.
Route 1: import an existing template file and save it as a Google Doc
Use this route when the template starts as a Word document or another file that your team does not want to recreate from scratch. The basic process is:
- Upload the file to Google Drive.
- Open it with Google Docs.
- If Google Docs presents a conversion option, create the editable Google Docs version rather than treating the original upload as the working source.
- Rename the converted document clearly and place it in the team’s agreed folder.
- Share it with the people who need to inspect or adapt the template.
- Decide whether the converted document will become a master or only a one-time working file.
For related guidance on handling the original Word source, use How to Open a Word Doc in Google Docs Without Losing Track of the Source File.
A conversion can change layout or document behavior. Do not call the file publishing-ready just because it opens successfully. Inspect the converted version before distributing it as a template.
Post-import inspection for publishing templates
Review the document in this order:
- Heading hierarchy: Confirm that the title, H2s, and H3s are represented by heading styles rather than only bold or enlarged text.
- Links: Open a representative set of internal, external, and linked-text URLs. Check that the visible anchor text still matches the intended destination.
- Images: Confirm that images remain in the expected locations and that each placement cue explains what asset belongs there.
- Tables: Check column widths, cell content, and whether the table still communicates its purpose after conversion.
- Placeholder text: Search for tokens such as
[CLIENT NAME],{{title}}, orTBD. Every placeholder should have an owner and a completion rule. - Sharing access: Confirm that the intended writers and editors can work in the converted Doc without giving broader access than necessary.
A simple pass condition is: a new writer can identify what to replace, an editor can identify what to review, and a publisher can distinguish article content from CMS instructions. If any of those conditions fails, clean up the template before reusing it.
For teams that need cleaner web-ready output from Word-based sources, see Google Doc to HTML Converter: How Agency Teams Create Clean, Publishable HTML.
Route 2: create a reusable master Doc and distribute copies
For a recurring article or report, the master-and-copy method is often the most dependable way to reuse a Google Docs template. It does not require a gallery submission. Instead, one document defines the approved structure and each assignment starts from a separate copy.
Create the master with a name that makes its status obvious:
MASTER — Client Blog Post TemplateMASTER — Quarterly Performance Report
When starting an assignment, make a copy and rename it for the specific work:
Client A — Remote Onboarding Guide — DraftClient B — Product Comparison — Draft
The master should contain the stable structure, instructions, and fields. The working copy should contain the assignment-specific wording, links, images, and metadata notes. Writers should not draft directly in the master unless the purpose is to revise the template itself.
The completion condition for each new use is straightforward: the working copy is independent, all placeholders have been replaced or deliberately removed, and the master still contains no client-specific content. If a writer discovers that the template needs a structural change, record that as a template revision rather than making an accidental change to the source.
Use How to Change a Google Docs Template Without Breaking Your Content Workflow when the question is how to update the master safely while active documents are already in use.
This route is also a practical answer to how to add templates to Google Docs when the gallery is unavailable or unsuitable. A clearly named master in a shared folder can be easier for a small publishing team to find and maintain than an uncertain gallery process.
Route 3: use the template gallery only when it is available to your organization
The Google Docs Template Gallery is useful when an available template already matches the document you need or when your organization exposes controls for managing shared templates. It should not be presented as a universal upload destination for every Google account.
To check whether this route fits your environment:
- Open Google Docs and inspect the template options visible to your account.
- Look for the organization-specific controls, if any, for submitting or managing templates.
- Check whether the people who need the template can actually find and use it.
- Test the template with a realistic document before making it the default starting point.
The supplied Google Docs community discussion shows why caution is necessary: users may not see the submission option described in older instructions, and community content may not reflect every current account configuration. Availability can depend on the Workspace environment or administrative setup.
If the option to submit a custom template does not appear, do not delay the publishing process while trying to force a gallery solution. Keep MASTER — Client Blog Post Template in a clearly named shared location and distribute copies. That fallback provides the core benefit—repeatable structure—without claiming that every account supports custom gallery uploads.
After the template is filled: choose a public Doc page, embed, or native WordPress post
A completed template still needs a destination. The choice should follow the reader’s purpose and the amount of control the site owner needs over the finished content.
| Publishing goal | Public Google Doc page | Embedded Google Doc | Native WordPress post |
|---|---|---|---|
| Straightforward document access | Strong fit when readers should open the document itself | Possible, but adds a container around the document | Strong fit when the content belongs as a normal site article |
| Collaborative editing experience | Keeps the document experience close to the source | Readers interact with the embedded document area | Editing happens in WordPress after the source is transferred or recreated |
| Site presentation and layout control | More limited to the document environment | The surrounding page provides some context, but the document remains separate | Best fit when the article needs the site’s post structure and editorial controls |
| Supporting reference material | Useful for a guide, policy, or downloadable-style document | Often suitable inside an existing page | May be unnecessary if the document is only supplementary |
| Durable website content | Consider whether the Doc experience is appropriate for the audience | Use when the Doc supports—not replaces—the main page | Usually the clearest choice for a primary article intended to live in the CMS |
Choose a public Doc page when the main requirement is simple access to a document and readers do not need a native article page. Confirm the sharing and visibility settings before sending the link.
Choose an embed when the document is supporting material inside an existing web page—for example, a detailed reference, worksheet, or client-facing resource. The surrounding page should explain the document’s purpose and provide context that the embedded source does not.
Choose a native WordPress post when the finished content is meant to be a normal, searchable article on the site and needs WordPress editing, categories, tags, excerpts, or SEO fields. Tenwrite supports exporting Google Docs content to WordPress and Blogger while preserving supported formatting, links, images, categories, tags, excerpts, and SEO metadata. Those supported fields still need review for the specific destination.
For a more detailed comparison of these choices, read Google Docs and WordPress: Embed, Copy, or Publish Content?. If a public Doc seems sufficient, Google Docs Publish to Web: When It Works—and When to Publish to WordPress Instead covers the destination question in more detail.
Template setup rules for repeatable client publishing
A publishing template should do more than make every document look similar. It should show writers where the article belongs, show editors what requires attention, and collect the information needed before a publisher prepares the final post.
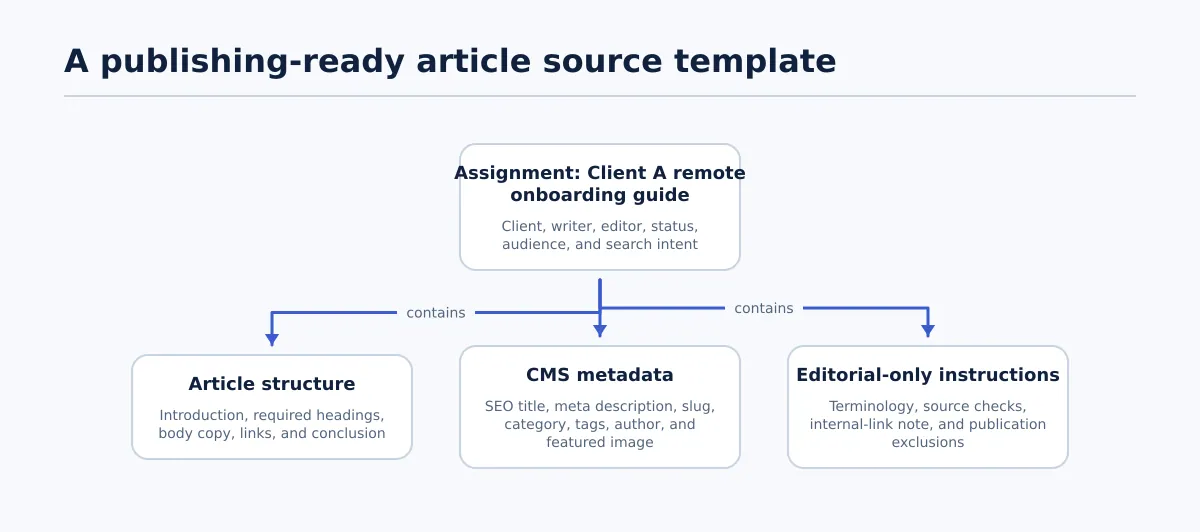
A practical blog-post template can use this structure:
- Working title — Include the draft title and, when relevant, the target keyword.
- Introduction — Leave room for the opening context, not just a placeholder sentence.
- Heading hierarchy — Use actual H2 and H3 styles so the structure is visible and transferable.
- Draft body — Keep the article text separate from editorial instructions.
- Link notes — Record the intended anchor text and destination for links that still need confirmation.
- Image placement cues — Mark where images belong and what each image must show or explain.
- Excerpt — Include a dedicated field if the destination needs a short summary separate from the introduction.
- Category and tag notes — Record proposed taxonomy without assuming that a draft note is the final CMS selection.
- SEO metadata — Add fields for the focus keyword, SEO title, meta description, slug, and canonical instruction when those are part of the assignment.
Separate completed article content from unresolved instructions. For example, [INSERT CLIENT EXAMPLE] should not remain in a document that is ready for publication. Either replace it with approved content or remove the section after confirming that it is not required.
A useful template test is to fill it with one realistic assignment, including a link, an image cue, a proposed excerpt, and the required SEO fields. Then ask a second person to identify every unresolved item without explanation from the original writer. If they cannot, improve the labels or instructions.
For a worked example of moving an assignment from source document to publishing destination, see the Google Docs publishing handoff guide.
Common problems and the right next step
There is no option to submit a custom gallery template
Treat this as an availability issue, not proof that the document cannot be reused. Check the controls visible in the organization’s Google Docs environment. If no submission route exists, use a named master Doc and make a copy for every assignment.
An editor changed the master by mistake
First, stop using the altered master for new work. Compare it with the latest approved structure, restore the stable version if you have one, and check whether any active working copies were affected. Then make the copy rule explicit: writers begin from a copy, while only the template owner changes the master.
The imported file lost formatting
Return to the post-import inspection list. Check heading styles, links, images, tables, placeholders, and access one by one. If the converted document is difficult to clean up, rebuild the small number of reusable structural elements in a native Google Doc instead of repeatedly correcting the same conversion problems.
The document looks fine but is not ready for publishing
A visually consistent document may still lack an excerpt, taxonomy notes, image information, or SEO metadata. Use the template fields to identify what is missing, then decide whether the content belongs in a public Doc, an embed, or WordPress. Do not publish or embed a document simply because it is complete from the writer’s perspective.
The team is treating the source Doc as the website
A Google Doc can remain the approved writing source without being the final web destination. If the content needs a site-native article, move it into the appropriate WordPress post process and inspect the result there. If the document is only supporting material, an embed may be enough.
Final check before you reuse the template
building a multi-client content workflow for agency publishing
The answer to how to upload a template to Google Docs depends on the result you need:
- Import an external file when the template begins outside Google Docs.
- Use a master-and-copy arrangement when the team needs dependable repeated reuse.
- Use the Template Gallery only when the relevant controls are available to your organization.
- Select a public Doc, embed, or native WordPress post based on the finished content’s audience and publishing purpose.
Before the next assignment starts, confirm that the master has a clear name, the working-copy naming rule is documented, placeholders are identifiable, and the template includes the fields required by the destination. A final test with a realistic article will reveal more than a visual review of the blank document.
If Google Docs is your approved content source, evaluate a publishing workflow that carries the finished document into the appropriate WordPress or Blogger destination without recreating routine content details by hand. For broader guidance, see building a multi-client content workflow for agency publishing.
How to Change a Google Docs Template Without Breaking Your Content Workflow
How to Open a Word Doc in Google Docs Without Losing Track of the Source File
Google Doc to HTML Converter: How Agency Teams Create Clean, Publishable HTML