Saving a Google Doc as HTML can be useful when a developer needs editable markup, a reviewer wants to inspect the source, or a CMS accepts an HTML file as part of its import process. It is not automatically the best way to publish the document.
An exported file represents the document’s body content. A WordPress or Blogger post may also need images in the media library, categories, tags, an excerpt, a featured image, SEO fields, a slug, and a destination-specific preview. Those requirements determine whether HTML export is a practical publishing route or simply an extra conversion step.
This guide separates the three common paths:
- Export HTML when a developer or publisher needs markup that can be edited or reviewed.
- Convert HTML when the document needs cleanup before its content is pasted or imported.
- Publish from the document when the destination needs supported formatting, links, images, and post metadata transferred together.
The original Google Doc should remain the approved source whichever route you choose.
What “save Google Doc as HTML” means—and what it does not mean
When someone asks how to save a Google Doc as HTML, they usually mean one of two things: create an HTML representation of the document, or move the document’s content through a converter that produces HTML. The result is intended for a web page, a CMS editor, a code review, or another system that accepts markup.
That is different from putting HTML into a Google Doc. Google Docs is a document editor, not an HTML authoring environment, and it does not treat arbitrary HTML as a native editing format. Research on embedding HTML in Google Docs describes separate workarounds for importing, embedding, or displaying HTML rather than a normal “write HTML here and render it” workflow. See the distinction discussed in How to Embed HTML in Google Docs.
| Task | Direction | Intended result |
|---|---|---|
| Export or convert a document to HTML | Google Doc → HTML | Markup that can be inspected, cleaned, pasted, or imported elsewhere |
| Insert or render HTML in a document | HTML → Google Doc or embedded content | Document content or an embedded representation of web material |
This article covers the first task. If you need to display a form, widget, or rendered web element inside a document, an HTML export will not solve that problem.
A second distinction matters for publishing: HTML body content is not the same as a complete CMS post. A file may contain paragraphs, headings, links, lists, tables, and image references while leaving the post’s category, tags, excerpt, featured image, SEO title, meta description, and release status for a separate step.
Choose the right path: export HTML, convert HTML, or publish from the document
Choose the route before you start moving content. The right choice depends on who needs to edit the result, how much cleanup is acceptable, and whether metadata and media must travel with the article.
| Route | Use it when | Required inputs | Completion condition |
|---|---|---|---|
| Export HTML | A developer has defined a template, an importer expects a file, or a publisher needs to review the markup directly | Approved Google Doc, export method, asset access, destination requirements, and a code editor or preview environment | The HTML has been reviewed, required assets are available, and the destination preview matches the approved structure |
| Convert HTML | The exported or copied content needs cleanup before it is pasted into WordPress, Blogger, or another editor | Approved document, conversion method, cleanup rules, and a way to compare the result with the source | Unwanted markup is removed, important structure survives, links and images work, and the cleaned result passes preview review |
| Publish from the document | The team needs supported formatting, links, images, categories, tags, excerpts, and SEO metadata handled as part of the publishing operation | Approved Google Doc, destination site, mapped post fields, supplied assets, and publishing instructions | The destination item contains the expected body, assets, metadata, and review status |
The first two paths are file- or markup-oriented. They are appropriate when HTML itself is an important deliverable. The third is destination-oriented: the goal is a complete WordPress or Blogger item rather than a standalone HTML file.
For recurring publishing, a document-to-CMS route can avoid re-entering fields that do not belong in the body. Tenwrite’s documented Google Docs publishing workflow supports supported formatting, links, images, categories, tags, excerpts, and SEO metadata for WordPress and Blogger. That does not remove the need to check the destination draft, but it changes the amount of manual assembly after the source is approved.
For the WordPress-specific considerations after obtaining markup, see How to Get HTML Code From a Google Doc for a Controlled WordPress Handoff.
A simple decision rule is:
- Choose export HTML if reviewed markup is the deliverable.
- Choose convert HTML if the markup is only an intermediate format and needs deliberate cleanup.
- Choose publish from the document if the post’s metadata and media are as important as its body copy.
Do not choose HTML merely because the destination is WordPress or Blogger. Both platforms can accept content through several publishing paths, and an HTML file may create more manual work than it removes.
Prepare the Google Doc before creating HTML
HTML conversion cannot resolve an unclear source document. Before exporting a client post, make the structure explicit and remove information that belongs only to the editing process.
Use this pre-export pass for an approved article:
- Apply real heading styles. Use the document’s heading levels for the title and sections instead of making ordinary text look larger or bolder. The exported representation may not interpret visual formatting the same way as semantic headings.
- Review link text and destinations. Each important link should have descriptive visible text and a destination that opens successfully. Do not rely on the link’s appearance in the document alone.
- Check image placement and rights. Confirm which images belong in the post, where each should appear, and whether the publishing team can use them. Record whether an image must also be uploaded or selected as a featured image in the CMS.
- Remove working notes. Delete comments, placeholder copy, editorial reminders, unresolved brackets, and temporary callouts that should not enter the web page.
- Inspect lists, tables, quotes, and special characters. These elements are more likely than ordinary paragraphs to need a rendered-preview check after conversion.
- Create a separate destination-field list. Record the category, tags, excerpt, slug direction, featured image, SEO title, meta description, and intended CMS status. These are post requirements, not simply body HTML.
For example, a document may end with an editor note saying [confirm statistic] or contain a heading that is bold but formatted as a normal paragraph. Fix both before creating HTML. Otherwise, the conversion step has to distinguish editorial intent from presentation choices after the fact.
Keep the original approved document unchanged or retain a clearly identified approved version. If cleanup is required, work in a copy or in the exported file while preserving the source that the team reviewed.
For broader guidance on preparing document content before a CMS transfer, see How to Get HTML Code From a Google Doc for a Controlled WordPress Handoff. The key point here is narrower: export quality begins with consistent source structure.
How to export or convert the document into HTML
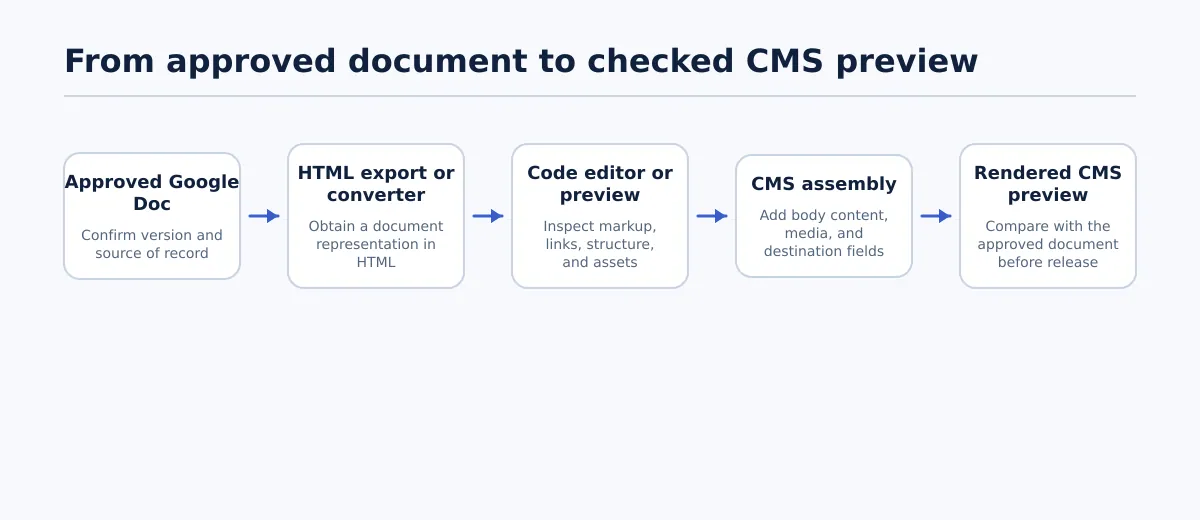 An HTML version is an intermediate publishing artifact until the destination preview and fields are checked.
There is no single current interface path that should be assumed for every Google Docs account, workspace, or third-party tool. Use the export option available in your environment or a conversion method your team has verified. Do not treat a familiar menu label from an older guide as a permanent product guarantee.
The practical sequence is the same regardless of the selected method:
- Confirm the approved source. Open the intended Google Doc and verify its title, version, and approval status.
- Obtain an HTML version. Use an available document export that produces HTML, or copy the document content into a converter that produces HTML. Articles such as How To Cleanly Export From Google Docs to HTML and Convert Google Doc to Clean HTML describe different approaches, but their outputs should not be assumed to be equivalent.
- Keep the output separate from the source. Save the HTML file or copied output with a clear filename, such as
client-post-v3.html, and retain the Google Doc link beside it. - Open the result in a code editor or preview environment. Inspect the actual markup and render it in a browser or staging context. A file opening successfully does not prove that its structure or assets are correct.
- Clean only what the destination requires. Remove document-specific wrappers or unwanted formatting without changing approved wording or hierarchy.
- Move the reviewed result into the CMS. Paste or import the HTML only after the content and assets have been checked. Then complete destination-only fields in WordPress or Blogger.
Downloading an HTML file and pasting content into a converter are different operations. A file export may produce a document plus supporting assets or implementation-specific markup. A converter may accept copied content and generate a new HTML representation. In both cases, the output must be reviewed rather than labeled “production-ready” by default.
If your team needs a WordPress-specific process after the conversion step, How to Get HTML Code From a Google Doc for a Controlled WordPress Handoff covers the next stage. If the goal is to compare HTML export with other publishing options, see How to Publish a Google Doc: Web Page, Embed, or WordPress Post?.
The source document remains the reference point. If the HTML looks different, compare it with the approved document and resolve the difference before changing the CMS item.
Check the HTML before adding it to WordPress or Blogger
A useful HTML review compares meaning and rendered behavior, not just whether the code appears tidy. Use the following sequence on the converted output and then repeat the important checks in the destination preview.
Compare the heading hierarchy
List the headings in the approved document and compare them with the rendered HTML. Confirm that the title is distinct from the body’s H2 and H3 sections, that no section was flattened into bold paragraph text, and that levels do not jump in a way that changes the intended structure.
Pass: the CMS preview presents the same section order and hierarchy as the approved document. Fail: a heading is missing, duplicated, or represented only by visual styling.
Open every important link
Click each internal, external, and source link in the preview. Check that it opens the intended destination and that the visible anchor text still describes where it leads. Pay particular attention to links copied from comments, tables, or text that was reformatted during conversion.
Pass: every required link resolves to the approved destination. Fail: a link is empty, malformed, redirected unexpectedly, or attached to the wrong words.
Verify images as CMS assets
Check each image’s placement, dimensions, source, and alt text. Determine whether the CMS requires the image to be uploaded to its media library rather than referenced from a temporary document location. If the post needs a featured image, verify that assignment separately; an inline image in the body does not automatically fill that field.
Pass: every approved image is available to the destination, appears in the intended position, has appropriate alternative text where required, and satisfies the site’s featured-image rule. Fail: an image is missing, inaccessible, misplaced, or still points to a source location the public page cannot use.
Inspect lists, tables, quotes, and characters
Render ordered and unordered lists, nested items, tables, block quotes, em dashes, quotation marks, symbols, and any code-like text. Look for flattened list numbering, lost indentation, unreadable tables, duplicated spaces, or characters replaced by boxes or entities that do not display correctly.
Do not repair a structural problem by adjusting random spacing in the CMS editor. First identify whether the HTML element is wrong, whether the destination editor changed it, or whether the theme controls its display.
Remove document-only artifacts
Search the output and preview for comments, placeholder language, revision notes, empty paragraphs, tracking text, copied page labels, and other material intended only for the editorial document. Check both the visible page and the editor’s HTML view when available.
Preview in the destination theme
The final check belongs in the WordPress or Blogger preview, not only in a local browser. The destination may apply styles to headings, tables, lists, links, images, and quotes that are not visible in the raw export.
A complete pass condition is:
The rendered CMS preview matches the approved document’s intended structure, all required links and images work, document-only artifacts are absent, and every required destination field is complete.
If the preview fails, return to the source comparison and classify the problem. Repair the HTML when the markup is wrong, replace or reattach the asset when the media source is wrong, or complete the CMS field when the missing information was never part of the document body. Do not publish simply because the text is present.
Worked example: choosing a path for a client blog post
Consider an illustrative agency assignment: a 1,200-word client article with six headings, two supplied images, three internal links, an excerpt, categories, tags, an SEO title, and a meta description. The Google Doc has been edited and approved.
The agency considers an HTML-only export because a developer maintains a reusable WordPress template and wants to review the markup before import.
Option A: use the HTML path
The publisher prepares the document, creates the HTML output, and opens it in a code editor. The two images are checked separately because the body markup does not prove that the files are available in the client’s media library. The publisher then compares the heading hierarchy, opens the three links, and previews the imported body in WordPress.
The excerpt, category, tags, SEO title, and meta description are entered separately. The featured-image decision is also handled separately. The route is appropriate because the developer has a concrete requirement for reviewed markup before import.
The completion condition is not “the HTML file exists.” It is “the reviewed HTML is in the CMS, the two images are usable, the three links work, the body preview matches the approved structure, and all destination fields are complete.”
Option B: publish from the document
If the developer does not require a standalone HTML artifact, the agency can use a document-to-CMS route that supports the required body elements and destination fields. The source document, images, links, category, tags, excerpt, and SEO information are prepared as one publishing input, then the destination draft is inspected.
This route is usually the better fit for this example when the agency publishes similar posts repeatedly. It addresses the complete post rather than optimizing only the body conversion. The team still checks the WordPress preview and confirms that the client site’s actual taxonomy and media requirements are satisfied.
The decision
Choose Option A when reviewed markup is a real technical requirement. Choose Option B when the recurring work is assembling complete CMS posts and the destination fields matter as much as the article body.
That distinction prevents a common mistake: selecting HTML because it sounds closer to the web, then recreating the same metadata and asset work by hand for every post. For a broader comparison of destination preparation, see CMS Publishing Workflow: A Practical Guide for Content Teams.
When to skip manual HTML export
Skip manual HTML export when it creates a second version of the same publishing job without solving a specific destination requirement. That is often the case when:
- The team publishes repeated posts across WordPress or Blogger sites.
- Categories, tags, excerpts, featured images, and SEO fields must be completed consistently.
- Editors do not maintain or review HTML directly.
- The destination needs a CMS draft for review before scheduling or publication.
- Images must be uploaded, assigned, or transformed by the destination rather than referenced from the document.
- The team is already using a supported document-to-CMS publishing route.
Manual export remains reasonable for a developer-defined template, a one-off markup review, a system that explicitly requires an HTML file, or a conversion that must be cleaned before import. The method should earn its place by reducing a known problem, not by becoming an extra ritual.
Retain the Google Doc as the source of record regardless of the route. If your team repeatedly moves approved documents into WordPress or Blogger and spends more time rebuilding metadata, attaching media, or correcting formatting than reviewing content, consider a document-to-CMS route such as Tenwrite. For the wider tooling decision, Content Agency Software: How to Build a Controlled Publishing Stack provides a useful next step.
The short answer is yes: you can save or convert a Google Doc into HTML using an available export or conversion method. But the HTML is only one part of a publishable post. Choose export when markup needs to be edited or reviewed, choose conversion when cleanup is the goal, and choose direct document publishing when the CMS needs the body, assets, and destination metadata assembled together.