A Word file can open in Google Docs in a few clicks. The part that deserves more attention is what happens after it opens.
You can use Google Docs as the editing surface while retaining the uploaded .doc or .docx file, or create a separate native Google Docs copy for collaborative editing. Those choices suit different publishing situations. Keeping the Office file protects the supplied source and its format. Converting it gives an editorial team a Google-native working document that is easier to comment on, revise, and prepare for a CMS.
This guide explains how to open a Word doc in Google Docs on desktop and mobile, how to choose between the two document formats, and what to inspect before treating the imported file as source material for WordPress or Blogger.
Choose the right option: open the Word file as an Office document or convert it to Google Docs
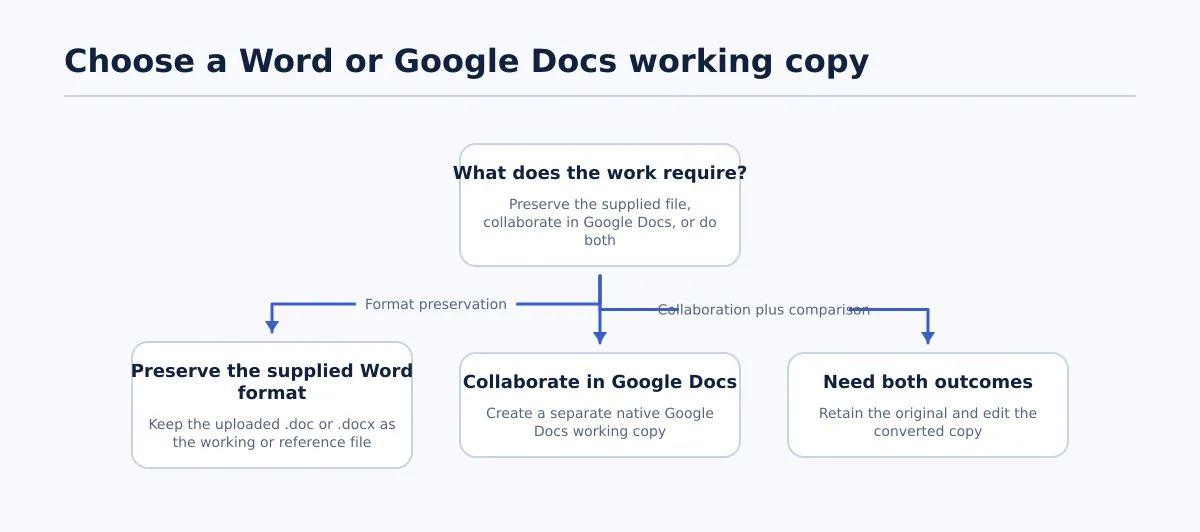 Choose the document format based on whether preservation, collaboration, or both are required.
Start with the work that follows the import rather than with the upload route. If someone only needs to read the document, check its contents, or make a small edit while preserving the supplied file, keep the Word format. If several people will revise the article in Google Docs, use comments, or prepare it for CMS publishing, create a native Google Docs copy.
| Working choice | Use it when | What to confirm |
|---|---|---|
| Keep the uploaded Word file | The original format matters, the sender expects a Word file back, or you need an unchanged reference copy. | The file is still identified as a Word document and its location is clear. |
| Convert to Google Docs | Editors need a shared Google Docs source for ongoing revisions, comments, and content preparation. | A separate Google Docs document exists and has one agreed working name and link. |
| Keep the original and work from a converted copy | You need collaborative editing but may need to compare changes with the supplied source. | Both files are retained, and the team knows which copy is current. |
Opening a Word file in Google Docs does not automatically mean that the file has become a Google Doc. The browser-based editing surface and the underlying file format are separate considerations.
For client work, a practical default is to retain the received Word file and create a clearly named working copy when collaboration or publishing preparation requires conversion. For example:
Client Article - supplied.docxClient Article - editorial working copy
That naming makes it easier to compare a formatting change with the source instead of guessing which file should be authoritative.
Method 1: upload the Word document to Google Drive and open it with Google Docs
This is usually the clearest desktop route when the file is stored on your computer or arrived as an attachment.
- Open Google Drive in the account and workspace where the document should be stored.
- Navigate to the intended client or project folder. Avoid leaving the upload in a general Drive location where another editor may not find it.
- Start a file upload and select the
.docor.docxfile from your computer. - Wait for the upload to finish.
- Locate the uploaded file in Drive and open it with Google Docs using the available open-with option.
- Check the document title and file type before making substantial edits.
The final check in step six matters. The file may still be an Office-format document opened through Google Docs, or a separate native Google Docs version may exist. Do not infer conversion from the fact that the document opened in a browser.
For a publishing team, record the working document’s link in the project location or task where the article is being edited. If you retain both versions, label the source and working copy explicitly. That small step prevents an editor from revising the supplied file while another person prepares an older converted copy for publication.
Method 2: upload the file directly from Google Docs
This route is useful when an editor is already working in Google Docs and needs to inspect one received Word file without beginning in Drive.
- Open Google Docs.
- Start the document-opening flow.
- Choose the Word file from the available upload or Drive options.
- Wait for the file to load.
- Check the filename and underlying format.
- Decide whether to keep editing the opened Word file or create a native Google Docs copy.
Uploading from Google Docs and uploading through Drive lead to the same basic question: which format should the team maintain? The route changes where you begin, not the operational choice that follows.
Use the Docs route when the file is a one-off inspection or an editor is already in the document workspace. Use the Drive route when the folder location, source retention, and project organization are important from the start.
How to open a Word document in the Google Docs mobile app
On a phone or tablet, you can use the Google Docs or Google Drive app to locate the Word file, upload it if necessary, and open it in Google Docs. The exact menu labels may differ between app versions, but the path is broadly:
- Open Google Drive or Google Docs and sign in to the intended account.
- Find the Word file in Drive, or use the app’s file-opening or upload option to add it.
- Tap the file to open it in the Docs app.
- Check whether you are viewing the Office-format file or a converted Google Docs copy.
- Convert it only if the mobile session is beginning a longer editing task.
Mobile access is suitable for a quick review, a comment, or a small correction. If the file will become publishing source material, reserve the detailed format review for a desktop screen. Headings, image placement, tables, links, and list indentation are easier to inspect there, and a phone view may not expose every layout difference.
What changes when you convert a .docx file to Google Docs
Converting a .docx file creates a Google Docs version intended for Google’s native document environment. That is useful for shared editing, comments, and continued work in Docs, but it is not a guarantee that every Word feature or visual detail will remain unchanged.
Word and Google Docs do not have identical feature sets. After conversion, treat the new file as an editable working document that needs inspection. Retain the original when the supplied formatting, source wording, or return-file requirement still matters.
Worked example: a 1,500-word client article
Suppose a client sends a 1,500-word blog post containing:
- A title and several section headings
- A table comparing two services
- Linked anchor text
- Two embedded images
- A bulleted list and a numbered list
- Publishing details supplied in an email or brief
After conversion, begin with the elements that carry meaning in the eventual article:
- Headings: Confirm that section headings remain distinguishable from body text and that their order makes sense. A heading that only looks bold is not necessarily a reliable structural heading for later CMS preparation.
- Links: Open important links and compare their destinations with the supplied source or brief. Check that the visible anchor text still describes the destination.
- Images: Confirm that each image is present, usable, and associated with the correct part of the article. Note any missing asset, caption, or image instruction rather than silently substituting one.
- Lists: Check whether bullets and numbering still communicate the intended sequence. Rebuild a list if indentation or numbering makes the meaning ambiguous.
- Tables: Inspect every row and column. A table may remain readable while still needing simplification for the destination CMS.
- Complex formatting: Pay particular attention to elements such as unusual layouts, embedded objects, specialized Word features, or visual treatments that are not ordinary paragraph content. These may require manual adjustment.
The result should be judged by editorial usability, not by whether the converted document looks identical at a glance. A clean, editable article with a few deliberate repairs is more useful than a visually similar document whose links, hierarchy, or assets have not been checked.
For a related route from Word content toward web-ready markup, see DOC to HTML Converter: How to Get Web-Ready HTML From a Word Document.
Run a publishing-focused format check after import
Once the file is open or converted, review it as a blog-post artifact rather than as a generic document. The goal is to find issues that could create cleanup during CMS preparation.
Use this example review for the client article above:
| Element | Check | Pass condition |
|---|---|---|
| Heading hierarchy | Identify the title, main sections, and subsections. | The structure is understandable without relying only on bold, size, or spacing. |
| Links and anchor text | Open representative links and inspect unusual destinations. | Important links resolve to the intended pages and the visible wording remains meaningful. |
| Images and captions | Match each image to its intended location and supporting text. | No image is missing, misplaced, or unexplained. |
| Bulleted and numbered lists | Read the list as an independent block. | The order, nesting, and indentation do not change the intended meaning. |
| Tables and callouts | Inspect cell contents and any text styled as a special block. | The information remains readable and can be represented in the destination format. |
| Publishing metadata | Check the title, excerpt, category, tags, and SEO fields supplied outside the body. | Each required field has an explicit value or a clearly identified unresolved item. |
Do not treat a successful import as proof that the CMS draft is correct. The converted Google Doc and the eventual WordPress or Blogger draft are separate artifacts. The first check confirms that the source is usable; the second confirms that the destination represents it correctly.
A useful stopping point for this review is simple: an editor should be able to identify the article’s structure, verify its important links and assets, and list the metadata still needed without returning to the original file for every decision. If not, keep the original nearby and repair the working copy before export.
Prepare the Google Doc for WordPress or Blogger publishing
After the imported document has been edited, use it as a prepared source—not as a promise that the destination is ready to release.
A practical sequence is:
- Finish the wording and structural edits in the agreed Google Docs working copy.
- Confirm that the document contains the intended title, headings, links, images, lists, and tables.
- Confirm the supported publishing fields: title, excerpt, categories, tags, and SEO metadata where the destination workflow uses them.
- Export the source into a WordPress or Blogger draft using the team’s selected publishing method.
- Open the destination draft and inspect the rendered result.
- Resolve destination-specific formatting, asset, or metadata issues before scheduling or publishing.
Tenwrite supports exporting Google Docs to WordPress and Blogger with supported formatting, links, images, categories, tags, excerpts, and SEO metadata. That can reduce repetitive transfer work for teams that already use Google Docs as an approved content source, but the destination draft still needs review. Supported fields and formatting do not remove the need to confirm how a particular post appears in its target CMS.
If your team already works from Google Docs, evaluate a draft-first WordPress or Blogger publishing workflow against one representative article. Compare the edited source with the resulting CMS draft before expanding the process to more content.
Common problems: unsupported files, opening failures, and formatting differences
Use the original Word file as the comparison point whenever the imported version looks wrong. Do not guess which copy is correct based only on appearance in one application.
| Symptom | Safe next action |
|---|---|
| The file cannot be selected for upload | Confirm that you selected the intended .doc or .docx file and that it is available locally or in the expected Drive location. Retry the upload from the correct folder. |
| The file uploads but does not open | Confirm that the upload completed, retry opening it from Drive or Google Docs, and check access to the account or location containing the file. Keep the original unchanged while investigating. |
| Collaborators cannot access the working document | Verify that they have access to the specific Google Docs copy or its Drive location. Share the working copy’s link rather than assuming access to the original Word file carries over. |
| The layout differs after conversion | Compare headings, links, images, lists, tables, and complex formatting with the retained Word file. Repair the Google Docs copy only after identifying the difference. |
| The team is editing different versions | Stop substantive editing long enough to identify the retained source and the current working copy. Rename or relocate the files so the maintained version is unambiguous. |
If a formatting difference affects meaning—such as a missing link, reordered list, unreadable table, or misplaced image—treat it as an unresolved content issue. If it affects only presentation, decide whether the destination CMS requires a repair and record the decision in the working task.
Final answer: how to open a Word doc in Google Docs without cleanup later
To open a Word file on desktop, upload it through Google Drive or use Google Docs’ file-opening flow. On mobile, open the file through the Docs or Drive app, then reserve detailed publishing checks for desktop.
The important choice comes after the file opens:
- Keep the Word file when preserving the supplied format or source is important.
- Convert it to Google Docs when the team needs a shared, editable working copy.
- Keep both when collaboration requires conversion but the original may be needed for comparison.
Before using the document for WordPress or Blogger, check the structure, links, images, lists, tables, and publishing metadata. Then inspect the CMS draft separately. That sequence keeps “opened,” “edited,” and “ready for publication” as distinct outcomes instead of treating them as one automatic result.